Sunday, 9 February 2014

Valentine Cards - last-minute printables!


Screen-style pop-up.
Fold panels back and stick down for a conventional-open card.
Clock the presentation pocket!
There's a simple-fold card with a liner, too.
Also with a presentation pocket.
Option A: simple pop-up.
Option B: flat with liner.
Some last-minute Valentine cards for you today. Simple to make - print and cut - not much sticking. There are two styles to choose from: a pop-up screen-style (as in furniture, not as in computer) card, and a conventional-open card with a patterned liner. Both cards have presentation pockets instead of sealed envelopes - the likelihood being that there will be no need to mail the card to your nearest and dearest!

The floral print on the cards is inspired by Love Hearts candy. (If you look closely at the flowers,  you will see that each petal is adorned with a Love Heart and phrase.)

Here are your printables:
LoveHeartPop-Up.pdf 
LoveHeartPop-UpPocket.pdf 

LoveHeartValentine.pdf 
LoveHeartValentineLiner.pdf 
LoveHeartValentinePocketFront.pdf 

LoveHeartValentinePocketBack.pdf 

How-Tos:
Pop-UP
To make the pop-up, print out the card and cut it out. With a craft knife, cut the two arcs on either side of the flower circle (pic above). Score the fold lines indicated. Make sure you score the centre fold across the centre of the big flower. To fold the card, accordion it, folding the flower circle as a mountain fold, and the areas above and below the flower circle as valley folds. 

This type of simple one-sheet-of-paper pop-up is the subject of a genius new book by Paul Jackson, papercraft guru extraordinaire:
(I'll be featuring more about this amazing new book, soon.)

The pocket for the pop-up is of one-piece construction. Cut it out, score the centre, bottom and side folds. Tuck bottom and side flaps under and stick them down. Finished: slip in the card. 

Love Heart Valentine

To make this card, print, then cut, the card and liner. You only need to secure the top of the liner to the inside of the card blank. Use a bit of d/s tape or a glue stick. The liner looks classy in translucent paper - like lightweight parchment.

The pocket for this card comes in two pieces, due to the size of the card. Cut out the pocket front and fold the flaps on three sides. Cut out the pocket back. Stick the folds onto the back piece. Your choice as to whether you put the printed side on the card back facing frontwards or to the back. Finished: slip the card in.

No sweets as props for this photoshoot - holding out for Valentine's Day for anticipated non-prop sweet treat!

Have a great Valentine's Day.

Friday, 7 February 2014

Valentine Gift Printables

Here are some Valentine printables that you can make up in no time. The theme: Love Heart sweeties, so my guess is that you'll fill them up with sweet treats. Choose from gift bags or ice cream cups.

Here are your free downloads:
LoveHeartsGiftBagA.pdf 
LoveHeartsGiftBagB.pdf 

IceCreamCupScallopsA.pdf 
IceCreamCupStraightA.pdf 

IceCreamCupStraightB.pdf 
IceCreamCupBLidsBase.pdf 
IceCreamCupScallopsB.pdf 

As you can see, you have your choice of two gift bag shapes. The ice cream cups come in two prints, in either straight- or scalloped top. 

Everything is easy to make - so no tut today. For the bags, crease the folds, stick the side seam, and insert the base tab - you're done (apart from the gift tag and optional bow). You can make the bags foldable or more boxlike depending on the weight of the cardstock you choose.

Ice cream cups: flex the body piece to make it curve gently. Stick the back seam. Fold the base tabs. Apply glue to the tabs and lower the base into the cup. Make sure you do this on a firm surface. Make sure the base is flush with the surface. Next, adhere the tabs. Add the gift tag - tie it on through one of the slots. Fill the ice cream cup with the contents - the lid tabs fit in the slots.

Have a sweet Valentine's Day!


Tuesday, 4 February 2014

Valentine Goodie Bags


Some sweet shop nostalgia today - Valentine goodie bags decorated with apothecary jar motifs. Two ways to make them: with a cellophane window for a realistic jar effect, or as a simple printable with an apothecary pic on the front. Both are a cinch to make. You can make them up in quantity for parties.

The bag style is a demi-pillow box: arched flaps on the bottom, but with a top opening. There's a built-in handle to tie together at the top. The top is secured with a flap so the bag contents can't fall out.

Here are your downloads. Tut follows.
ValentineBagA.pdf
ValentineBagB.pdf
ValentineBagCellophane.pdf

Valentine Goodie Bag Tutorial
1 Print out your gift bags and cut out the basic shape. Score and fold the centre fold - use a small metal ruler and a fine-point embossing tool (a spent fine-point pen work well, too). Next, mark the side flap, butting the ruler against the long bag edge. 
2 Next, mark the top flap in the same way.
3 Fold the side flap inwards and crease with a bone folder.
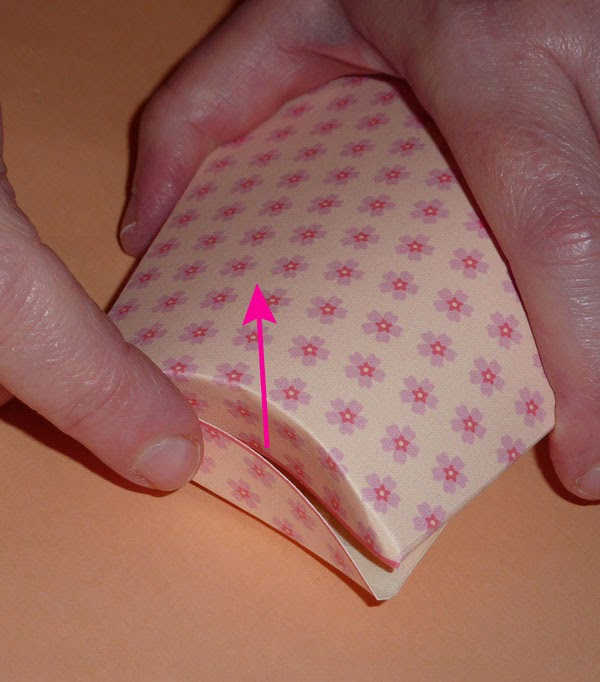
4 Now it is time to mark the curved lines of the pillow folds. Use the marquise-shaped template as your guide. The side with the sharpest curve faces upwards.
5 Make sure you mark the back curve in the same way! Fold gently along the scored lines when you are done.
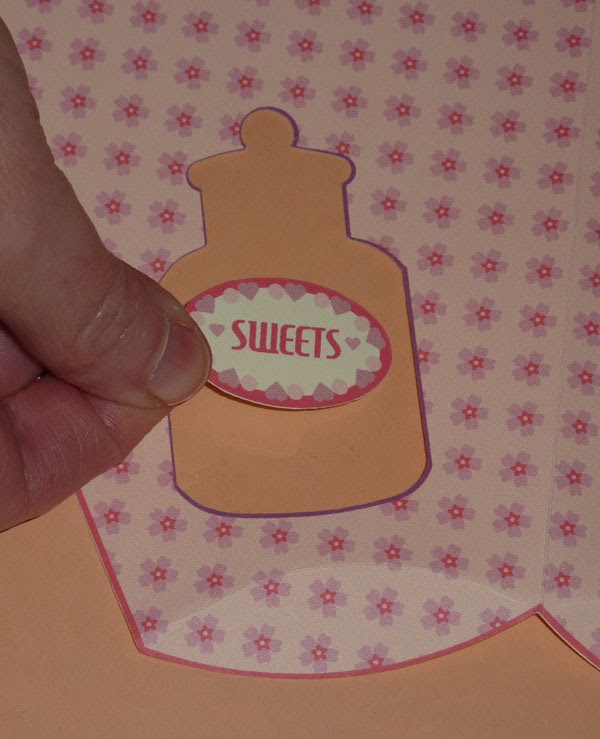
6 Above, the inside of the bag, folded and prepped. Cut a piece of cellophane just slightly larger all round than the cut-out - you can get several "windows" out of a cello card protector envelope. Go around the perimeter of the apothecary jar cut out with pieces of d/s tape. You also need a snippet of tape on the bottom front flap and under the top flap.
The tape for the long side flap belongs on the front side.
7 Smooth the cellophane in place over the cutout.
8 Stick the label on the centre front of the apothecary jar.
 9 Seal the long side flap. Align the edges carefully.
10 Seal the bottom flap.
11 Your sweetie bag is now finished. Add a bow to the top of the apothecary jar, fill the bag with sweet treats, seal the handle flap and tie a bow round the handle. You can add a gift tag, too.

I like to put the sweets in a clear cello bag inside the bag. That way, the gift bag can be recycled - and the sweets can be removed easily.

Of course, the bag styles without the window cutouts are even easier to make.

I have to admit, I hit the M&Ms while doing this post. Never had the ones with crispy rice inside before! Here, I'd like to share some:
Have a great Valentine's Day!