Monday, 18 May 2015
Bandanna Boxes & Trays
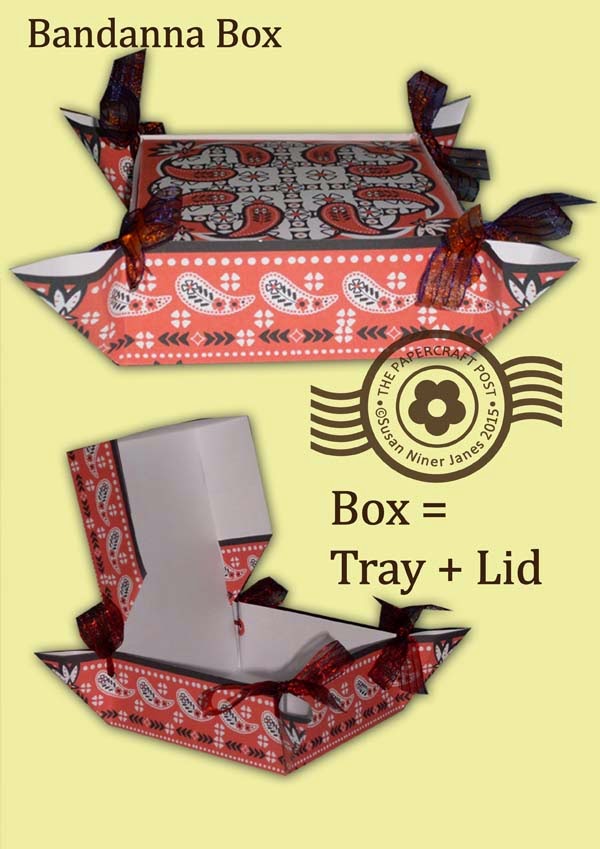
Prints are big this season, so get on the bandanna-wagon. Use these bandanna-inspired papercraft printable boxes/trays for gift giving or storage. They are easy to make and so very pretty.
The tray is a square bow-tied at the corners. Add a lid to make a box. Or, for a no-frills version, glue to lids together to make a bakery-style box.
Here are your free bandanna printables:
RedBandannaTray.pdf
RedBandannaLid.pdf
BlueBandannaTray.pdf
BlueBandannaLid.pdf
Bandanna Boxes & Trays
Bandanna Box
1 Print the designs on lightweight card. Score the fold lines using a fine-point embossing tool held against a small metal ruler. Remember the diagonal corner folds on the tray. Cut the slits in the box lid.
2 Punch the holes in the tray/base using a 1/8in circle handpunch. Glue reinforcements around the holes (the holes in the centre of the reinforcements are also punched with the handpunch).
3 Crease the folds - a bone folder makes nice crisp folds. For the corner ties on the tray base, you need 25-30cm (10-12in) of ribbon per corner. Thread the ribbon through the holes and tie into bows.
4 Assemble the box lid, gluing the front corners. I like to give the back corners a nice finishe with a diagonal turnback - this is your choice.
5 Glue the back of the box lid inside one side of the base. To close the box, the lid sides fit inside the box.
Bandanna Tray
The Bandanna Tray is made in the same way as the box base, only it is double-sided. Print out two trays and stick them back to back. How to do that? I recommend this genius easy option:
Stick It adhesive sheets
No mess, no fuss, easy peel. Presto - almost-instant double-sided paper.
No-Frills Bandanna Box
Simply glue two lids together, overlapping the back panel.
Enjoy making your Bandanna Boxes, whether you are making them to give or keep.
Tuesday, 12 May 2015
Mobile Art, by Clare Youngs. Book Review.
Mobile Art
Make your home a magical
place with these 35 beautiful hanging decorations
By Clare Youngs
Cico Books 2015
Paperback £12.99
ISBN 978 1 78249 209 2
Star rating: ****
Making mobiles is a fun craft idea for the spring and
summer, when a breeze through an open window can make your project dance.
Talented and prolific craft author Clare Youngs is back with
a winning new title bursting with creative energy. The subject this time is mobiles. Mobiles are purely
decorative – so they present a great opportunity to let the imagination run
wild, and that is precisely what the author has done with her playful and
inventive collection of action projects.
Photographing mobiles can be tricky for a couple of obvious
reasons. First up, the object you are photographing just won’t stay still.
Secondly, a still photo can’t convey the kinetic motion of the mobile. So – it is
an amazing feat on the behalf of the author and the production team that nearly
every project in the book seems to be dancing on the page, and is begging to be
made. Many would be suitable for kiddie decor.
The mobiles, most of which are easy-make, are made of a
variety of materials – with an emphasis on papercrafting. Papercraft projects
include Party-Time Sparkle, which is
a papery interpretation of those wooden wind spirals you see in garden centres.
The idea works a treat in mirror card. The Sausage
Dogs mobile is big fun - the tube-like dachshunds are cleverly fashioned
from paper, with paper “bones” to weight them like a kite’s tail. Floral Filigree is a jumbo
quilling-inspired mobile. Very effective. There is also a traditionally-quilled
snowflake mobile. Birds are an obvious choice for mobiles and Clare Young’s features two takes on the idea. Birds in Flight consists of jazzy
papercrafted streamlined birds with bright graphic designs. Birds of a Feather features 3-D papercut
feathers - like lacé, without the links. Paper-Clip Graphics works a treat. This quick-make mobile channels
the typographic trend, with magazine cut-outs paper-clipped onto the hanging
wires. Balancing Act is a genius construction
of papercrafted acrobats performing a trapeze act. They cleverly hook onto each other in a feat
of derring-do (reminds me of that fondly-remembered monkeys in a barrel toy).
There are a very few projects that work less well than the
others – Tassels and Beads, is a bit
clunky. The beads are way too heavy for the delicate paper fans. This mobile is much more
static than the other projects in the book.
There are a lot of pom pom enthusiasts out there – it is a
craft trend you just can’t ignore – so I
will mention that the Pops of Colour
mobile features pom pom cascades. Other techniques that get a look-in include
macramé, fabric craft (hand-stitched elephants, Folksy Felt Horses), and
Himmeli (Finnish strawcraft).
There is lots of variety not just in the projects, but in
how the mobile mechanisms are constructed. Some mobiles feature objects
suspended from a bar, others have a top ring; sticks crossed at top,
marionette-fashion, and also cascades of carefully-balanced bars Ă la AlexanderCalder.
If you are fascinated by mobiles and happen to live in the
vicinity of London, you will want to check out the Alexander Calder exhibition
scheduled for November onwards at Tate Modern. Calder was the great grand-daddy
of kinetic sculpture, and the exhibition will be an event.
While you are waiting, you can try your hand at Clare Youngs’
delightful Mobile Art.
Tuesday, 5 May 2015
May Baskets
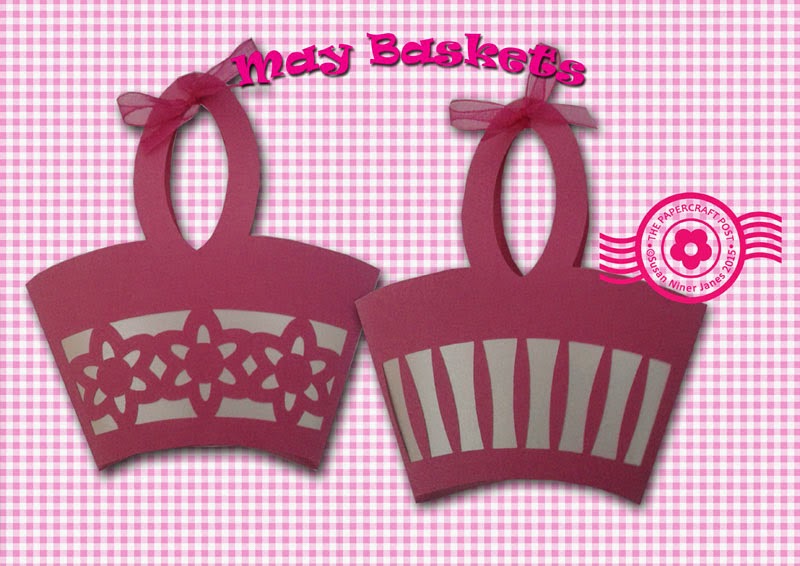
These pretty baskets make great party favours, containers for small gifts, or storage containers for small items of craft stash. They are really easy to make, being demi-pillow boxes.
I have backed the cut-out areas with pearlescent paper, but vellum would work a treat. Two different styles are provided for the bag fronts and tags - but the bag back is the same for both.
Here are your free pattern templates:
FloralMayBasket.pdf
BarsMayBasket.pdf
MayBasketBack.pdf
FloralMayBasket.svg
BarsMayBasket.svg
MayBasketBack.svg
May Baskets
1 Cut out the pattern pieces. Emboss the fold lines using a fine-point embossing tool held against a small metal ruler. Use the marquise-shaped base template to mark the top base curve on the basket front and back pieces. Crease the folds.
2 Glue the front liner behind the front cut-out area.
3 Join the side flaps.
4 Pop in the pillow box base to complete the bag. (Yay - always fun when you pop-in a pillow box to dimension it - papercrafter's jollies!)
5 The tags are optional.
Tip: the demi-pillow box construction makes the bag top spread open, so tie the handles together with a pretty ribbon bow.
In pearlescent white and/or gold metallic, these bags would make sweet wedding favours.
I have backed the cut-out areas with pearlescent paper, but vellum would work a treat. Two different styles are provided for the bag fronts and tags - but the bag back is the same for both.
Here are your free pattern templates:
FloralMayBasket.pdf
BarsMayBasket.pdf
MayBasketBack.pdf
FloralMayBasket.svg
BarsMayBasket.svg
MayBasketBack.svg
May Baskets
1 Cut out the pattern pieces. Emboss the fold lines using a fine-point embossing tool held against a small metal ruler. Use the marquise-shaped base template to mark the top base curve on the basket front and back pieces. Crease the folds.
2 Glue the front liner behind the front cut-out area.
3 Join the side flaps.
4 Pop in the pillow box base to complete the bag. (Yay - always fun when you pop-in a pillow box to dimension it - papercrafter's jollies!)
5 The tags are optional.
Tip: the demi-pillow box construction makes the bag top spread open, so tie the handles together with a pretty ribbon bow.
In pearlescent white and/or gold metallic, these bags would make sweet wedding favours.
Subscribe to:
Posts (Atom)