Here's a pretty, portable way to combat the heatwave. A dainty, lace-look paper fan in a compact pocket. Pop one into your purse and be prepared for stuffy train carriages and other hot spots. The fans are super-easy to make - and there's a choice of two colourways.
Here is your free printable project:
PurpleFan.pdf
PurpleCase.pdf
PurpleFan.svg
PurpleCase.svg
PinkFan.pdf
PinkCase.pdf
PinkFan.svg
PinkCase.svg
Fan-in-a-Case Tutorial
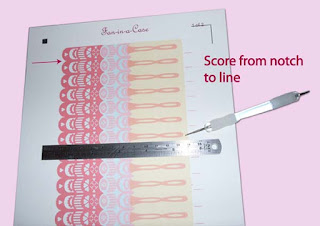
1 Print the fan. Score the folds from notch to line using a fine-point embossing tool held against a metal ruler.
2 Cut the fan out and crease the folds with a bone folder. Nice, sharp creases. Accordion the pleats.
3 The fans shown are made using 90gsm paper. That is too thick to staple - so you must punch holes to thread a ribbon tie through. Use a 1/8in circle handpunch. Punch the holes at the marked indentations of the fan handle, ash shown.
4 For each fan, you need 30cm (12in) of pleated ribbon. Thread the ribbon through the holes with a tapestry needle. Turn the fan to the back and tie the ribbon, cinching in the pleats. Turn ribbon back to the front. Thread each ribbon tie through the holes to the opposit side of the fan base. Finally, tie the ribbon tails into a bow. You can trim the tails at an angle and apply PVA glue to the ends to prevent fraying.
Note: If you print the fans onto thin photocopier paper, then you can opt to staple the fan together instead of punching holes and lacing.
5 Case: print the case, cut it out. Score the folds from corner to corner, as shown. Apply d/s tape to the flaps, as shown. Fold the flaps as shown above, then fold the case back down, with edges aligned. Pop the fan into the case. You're done!
The fan is light and compact - ideal to carry in your bag, or as a party favour - especially at weddings (could come in handy during the ceremony). Suggestion: make a fan and post it to a friend - fan mail!


No comments:
Post a Comment