Showing posts with label American Crafts cardstock. Show all posts

Monday, 9 December 2013

London Skyline Milk Cartons

Maxi - and minis.
Midi-Gherkin (variation)
Today's post is a bit of a stretch - but stay with me, since it is the festive season and you could probably do with some gift packaging solutions. I'm still on my milk carton binge - experimenting with new shapes. A worthy type of box! These milk cartons are loosely inspired by the new generation of London skyscrapers that have been popping up lately. So... there's a triangular Shard, a bulging Gherkin, and a top-heavy Walkie-Talkie. There's also a slightly wider midi-Gherkin - I just liked the shape.

Here are your free downloads:
GherkinMilkCarton.pdf 
MidiGherkinMilkCarton.pdf 
ShardMilkCarton.pdf 
WalkieTalkieMilkCarton.pdf 

To make the milk cartons, print them up on copier-quality cardstock and cut them out. I've used American Crafts Cardstock, which is printer-friendly - takes the ink beautifully and has a lovely texture. (You must trim it down to A4 to fit the printer). Score the folds, then pre-fold them. For the prints, you will have to eyeball the location of the folds - you'll figure it out. Next, glue the ajacent sides, then the top flap. There's access to the box contents through the "trap door" on the bottom:
Fold the side flaps first.
Then tuck the tab into the slot.
I like to punch two holes in the milk carton top and tie a craft thread bow through them. You can thread on the gift tag while you are at it.

Of course, you can enlarge or reduce the designs as desired.

So that's milk carton mania for today!

This project has been sponsored by Handy Hippo, which has 20% off its products today! (You must key in the code: SAVE20).


Thursday, 21 November 2013

Mini Milk Cartons & Crates

Today we have some cute Mini Milk Cartons - and Milk Crate Holders. Fill the cartons with goodies or small surprises - fun party favours or stocking fillers. They are quick and easy to make. 

Here are your free downloads:
MiniMilkCartonCrate.pdf 
TallMilkCartonCrissCrossCrate.pdf 
MoreCrates.pdf 

MiniMilkCartonCrate.svg
TallMilkCartonCrissCrossCrate.svg 
MoreCrates.svg

Your printables look like this:
If you are going to make this project by hand, then you will need to carefully cut out the holes in the crates with a craft knife. (Alternatively, you could choose not to cut out the crate holes - the finished result will still look fun.)

I have made this project with AC Cardstock. It comes in 12 x 12 sheets, so you need to cut it down to A4 size to fit through your printer. This is worth the small effort, because the cardstock prints and folds beautifully!

Making up the project is super-easy, but here's a tut, anyhow:

Milk Carton & Crate Tutorial


1. Above, the pieces cut out and folded. All the folds are mountain folds except for the folds at the top of the "V's" and the top flap, which are valley folds. If you are hand-cutting the project, don't forget to cut the slit in the base of the milk carton.
2. Next, join the side of the milk carton, either with tacky PVA glue or d/s tape. Your carton should now look like this:
4. Next, fold the bottom flaps. First two: the side flaps. Fold one over the other, like so:
Then fold the flap with the slot upwards. Finally, secure the bottom of the carton by inserting the tab into the slot:
5. Time now for the milk carton top. Make sure that the sides have been folded inwards:
Squeeze the top together as shown (sorry for blurry pic). Next, seal the top flaps together with d/s tape. You can also punch or piece two holes through the top and tie it together with a craft thread bow.
6. Time now for the crate:
Above, a crate cut out, scored, folded. Apply d/s tape or glue to the side strips of the side panels. Join flaps to adjacent sides to complete the milk carton:
Below, the finished milk crate:
All the crates are made this way, no matter what the style.

That's all there is to it. Add a gift tag if desired.

Enjoy the milk run! 

 This project was sponsored by Handy Hippo .


Saturday, 16 November 2013

Bakewell Tart Gift Boxes


Are you still thinking Bake Off? Here are some papercrafted Bakewell Tart Gift Boxes. I have to admit, when I see projects like crocheted cupcakes (and I do love crochet), I think "get a life!". But these cake look-alikes are big fun to make - and they are functional - they are gift boxes that make super-cute party favours or stocking fillers. Quick to make with my free downloads (and tut).

The "Bakewell Tart" is made of a hexagonal box base and an "icing/crust" topper. The box and topper are made from American Crafts Cardstock, and the flower and holly leaves are made from
Inspire Me Paper.

Here are your free downloads:
BakewellTartGiftBoxRed.pdf
BakewellTartGiftBoxRedGreenPrint.pdf 
BakewellTartGiftBoxSnowflakePrint.pdf 

BakewellTartGiftBoxRed.svg 


To use your American Crafts Cardstock, you must cut it down from scrapbook size to A4 size so it can go through the printer. (No worries, I will come up with some projects for the leftover strips of cardstock...)
The card is printer and cutter friendly. It has a lovely textured surface which takes folding and gluing well.

Here' how:

Bakewell Tart Gift Box Tutorial 

1. Above, Bakewell Tart components assembled and ready to go!
2. Score the box folds, crease on the folds. To assemble the box, fold up the sides and glue each tab onto the adjacent side on the inside of the box. Like so:
Here's a pic of the box, all joined up:
(I cheated and used d/s tape for demo purposes. In real life, use tacky PVA glue.)

3. Time to fold the box top. Fold down each flap consecutively, going in an anti-clockwise direction. The rounded flap corner goes on the outside.
When you get to the last flap, tuck it under. Doh Dept: of course, you must fill the box with its contents (sweeties a prime contender) before you stick on the topper! :)
Above, the finished hexagonal box. You can use it on its own, without the Bakewell Tart topper!
4. Time to make the topper. Above, the topper disc cut out. Now, if you have a digital papercutter, you are one lucky person. If cutting out this many-armed shape by hand - patience is a virtue! (It goes pretty quickly, really!). Use decoupage scissors, for fine-cutting. Emboss the centre dot, so it shows on the wrong side of the topper. Now, turn the topper over. Like so:
Shape the arms inwards, to prime them for folding:
4. Now for the fun part: folding the "crust":
Fold and tuck each arm as shown. Bend each arm backwards and tuck the rounded end of each arm behind. Fold each arm consecutively, going in an anti-clockwise direction. Magic: a 3D corded effect forms.
When you get to the last arm, tuck it under in the same way.
Above, the finished topper base.

5. Next, score each holly leaf down the centre and fold it in half. Glue the holly leaves in place on the topper like so:
Only glue on half of each leaf, for 3D effect.
6. Now for the flower:
Fold each arm of the flower at the base, as shown above. Next, fold each arm down consecutively, tucking the last one under:

Pierce or punch a hole in the centre of the flower and insert a mini-brad. You have been given two styles of centre flowers. The other style (smaller flower) is made in exactly the same way.
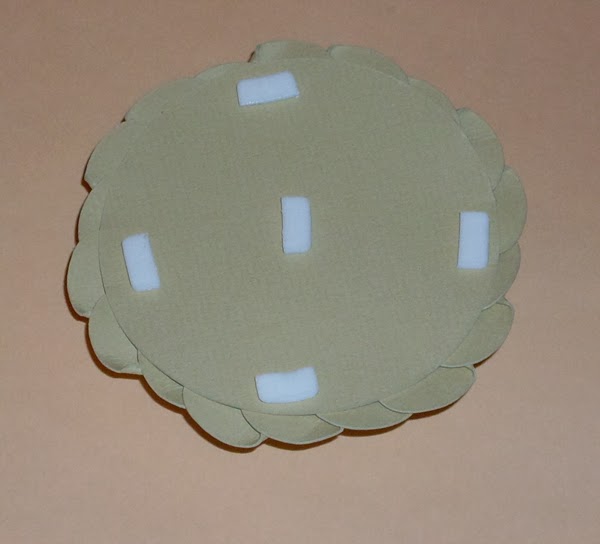
7. Next, place sticky foam pads or sticky dots on the wrong side of the topper. One in the centre, and also at 12, 3, 6, and nine o'clock. Time to attach the topper to the box:
Invert the box and press it onto the topper. It is easier to see what you are doing this way, so you can get everything centred correctly.
Above, a finished Bakewell Tart Gift Box.
8. And here's the gift tag:
Just loop some craft thread through the hole. You can attach the tag to the flower brad.

To open the box, you must remove the topper. Do it carefully, and you can recyle the Bakewell Tart Gift Box! 
 So, there you go. Time for a papercrafter's tea party! Enjoy.

Note: Handy Hippo Crafts, where you can find the AC Cardstock and Inpsire Me papers used for the Bakewell Tarts, has sponsored this project.