Showing posts with label Christmas gift packaging. Show all posts

Thursday, 17 October 2013

Ivy Trellis Gift Bags

These Ivy Trellis gift bags can be used all year round - add a pretty red bow for the festive season. The ivy link garland is fun to make and is a very useful embellishment. Go ivy on greeting cards, giftwrap treatments, scrapbook pages. Enlarge the links to make Christmas tree garlands or party decs - makes a nice change from paper chains.

There are downloads for the bags and garlands, plus a mini-tut on the garlands.

Here are your files:
IvyGarland.pdf 
IvyTrellisGiftBagSmall.pdf

IvyGarland.svg 
GardenTrellisGiftBag1of2.svg 
GardenTrellisGiftBag2of2.svg 
IvyTrellisGiftBagSmall.svg


About the gift bags:  The bigger-sized gift bag is pieced. The bag handle reinforcements are optional. Glue them behind the handles (with glue stick) if you think your paper choice is a little flimsy. Score the folds, then crease with a bone folder. Join the "seam" - it goes at the back. For the bag base, fold in the side flaps first, then slip the tab into the slot. You can glue the tab for a secure seal. If the bag contents are heavy, line the base with a paper rectangle a smidge smaller than the size of the slotted base.

Tie one end of the garland onto the bag handle. Secure the other end with a small Dodz sticky dot by 3-L.

Ivy Garland Mini-Tut
1. Cut out the ivy loopy links-it is best to use double-sided green paper - looks more realistic. But you can print-and-cut if you prefer. Crease each leaf in half to make a centre vein. For a nice, crisp fold: score first with an embossing tool held against a metal straightedge.

2. Link the loops. The loop end is inserted from underneath the previous loop. Very important!
3. Next, slip the inside edge of each ivy leaf on top of the previous loop. That's it! Repeat to make an ivy garland of the desired length.
Ivy Garland
Here's a fun (and eco-conscious) gift presentation idea. Simply wrap an ivy garland, spiral-style around a wine bottle. Secure the top with a bow and the end with a glue dot. Tie the gift tag onto the throat of the bottle. No wasteful giftwrap. The recipient knows what the gift is, anyhow - there's no disguising a bottle! 
A vine for the wine!


Wednesday, 18 September 2013

Patchwork Star Gift Box


More slot-lid gift boxes - I'm on a binge. These are topped with a folded
patchwork star (which coordinates with the box print):
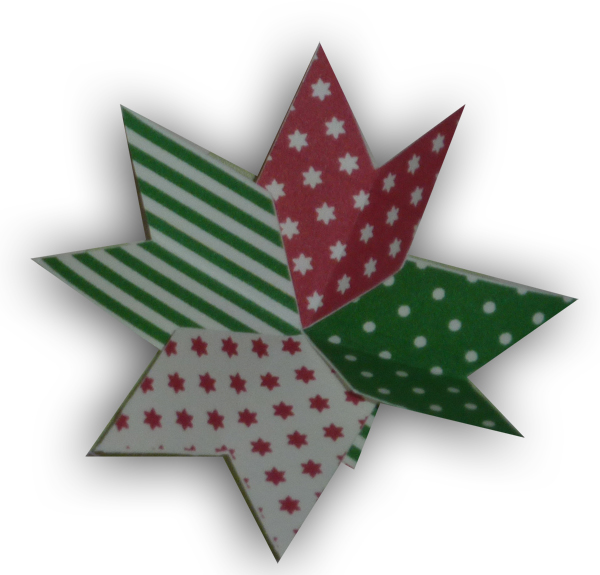
The folded star makes a pretty swirl top-knot. Looks a bit like notched ribbon. There's a tut to follow on how to fold the star. 

Here are your downloads:
PatchworkStarGiftBox.pdf 

The file download looks like this:


Here's the tut for the foldy-star:
1. Pic left shows the patchwork star pattern template cut out an folded.
The folds at the base of each arm are mountain folds (green arrow). The folds at the V-point of each arm are valley folds (red arrow). Pic right shows the completed patchwork star.
2. Fold the first arm to the centre.
3. Proceed in an anti-clockwise direction. Fold two: same as first. Make sure the bases of the V-notches meet in the centre.
4. When you get to the third arm, you have to swing it under and around. It's a perfect fit - it will catch in the centre.


5. Side four: last side. Swing it under and around, as for the previous step. Tah dah!:


Here's a pic of the flip side (left), and the right side (right) of the patchwork star:
A sticky dot fixes the star to the box top.

Of course, you can also use the foldy stars as embellishments on cards and/or scrapbook pages.

No how-tos for the box. Been there, done that!


Thursday, 8 August 2013

Shaker-style Gift Boxes

For summertime gifts.
... or a big headstart on Christmas crafting.
These Shaker-Style mini gift boxes are right any time of year. So, I've styled them two ways: all-occasion floral decoration or Christmassy/Wintertime. 

The boxes are quick and easy to make - there's a tutorial later on in this post.

Here are your free downloads:
Shaker-StyleBasketFlowers.pdf 
Shaker-StyleChristmasBasketA.pdf
Shaker-StyleChristmasBasketB.pdf
Shaker-StyleChristmasBasketA.svg
Shaker-StyleChristmasBasketB.svg


For the flower baskets, I've just given you a .pdf. The shapes are easy enough to cut out by hand. Use a craft knife held against a ruler for the handles. Cut inside the outlines.

Of course, once you have downloaded the Shaker Box files, you can enlarge the pattern templates to make bigger boxes.

Shaker Box Mini-Tut:
1. Cut out the pattern pieces and score the folds. Use a fine embossing tool held against a metal straightedge. On the basket lid, score fold lines down the centre of the lid and across each tab. On the base, score across the base of all the tabs. On the side pieces, score the base of the tab. Remember to pierce the brad holes, if necessary.
2. Next, glue the side piece tabs onto either side of the base. The little tabs belong inside. Make sure that the decorated sides face outwards.

3. Thread a brad through the holes on the first side in the following order: both handles, right side of box, left side of box, lid tab, box base tab. On the inside of the box, spread open the brad wings, like so:
4. Next, repeat the operation for the remaining side. It is a little bit tricky getting inside the box to spread the wings on the second brad, but not in a ship-in-a-bottle league! You can (carefully) use scissor-tips to spread the brad wings if you need an assist reaching the brad inside the box interior. Here's a pic of the job, done:

Note: no need to glue the little tabs on the inside of the box. They are pretty secure as they are.

5. Separate the handles and spread them apart. Lastly, add craft thread ties to the holes on the lid and the base. Tie into bows.
These boxes make sweet party favours.