Continuing on the hygge theme, here are this year's toast rack card racks. Looks like they have been influence by two things in the news - the hygge trend... and Toblerones! These card racks are handy for storing greetings cards, especially if you get too many to display them all - some people prefer to browse.
As always, I was also influenced by Christopher Dresser, the Victorian industrial designer. Toast racks? He had a million of them (all genius):
Here are your free toast racks:
CardRackSides16A.pdf
CardRackSides16A.studio3
CardRackSides16B.pdf
CardRackSides16B.studio3
CardRackBody16.pdf
CardRackBody16.studio3
As you can see, there's one card rack body and a choice of two side panels.
Toast Rack Card Rack 2016
1 Print and cut the templates by hand or Silhouette machine. (By hand: you will have to use a craft knife, against a metal ruler, over a mat to cut the slots - take care.)
2 Score the folds at base of body and around side edges. Crease the folds.
3 Use double/sided tape to assemble the card rack. First, stick the side panel bases onto the base of the card rack body. Then, work around the side units, joining them to the card rack body. Finally, seal the join at the base of the card rack body.
4 Gently shape the rack body into the "organic triangle" shape.
Good to go! Have happy, hygge holidays!
The holiday season is upon us - and we could all use a smile-inducing treat, the sooner the better - say, for breakfast. Also, the festive coffees are in the shops, so I am taking my cue. My papercraft project is a hygge-themed oat pot cover. Hygge - in case you have been living under a rock - is the buzz word of the season, the Danish word for cosy, homelike goodness - something we all need more than ever. So - I have decorated the oat pot cover with Scandi-inspired folk art motifs - and a warm and cosy greeting.
Feel the warmth of the oat pot as you gaze at the smile-inducing greeting! :)
Here is your free hygge oat pot cover:
HyggeOatPot.pdf
HyggeOatPot.studio3
Attach the cover with a strip of double-sided tape on the coloured underlap. Stick on the lid with a few snippets of d/s tape - it camouflages the foil oat pot lid.
You can also use this project to recycle oat pots as gift containers. I have included a gift tag. (You will have to glue the lid on to the rim of the pot.)
Hope you have a hygge holiday season!
Bandanas are a hot fashion item this spring - fine by me - I've always been fond of the paisley/mixed print thing. So - here's a handy dandy little project in a bandana print. Mini pockets that can be stored on a ring. (I've called them keyring pockets, but that is actually a book ring...)
Clock the motif on the pocket back.
Here's your Friday Freebie project:
BandanaPockets.pdf
BandanaPockets.studio3
Bandana Keyring Pockets
1 Cut out the components and score the folds with a fine-point embossing tool held against a small metal ruler. Take special care scoring the curves folds at the base. If cutting by hand, you will have to pierce holes for the brads.
2 Crease all the folds.
3 Glue a reinforcement around the pocket back hole and the other one around the pocket front flap. Glue the brad mats back-to back.
4 Glue the top of the pocket flap on to the top of the wrong side of the pocket back, edges aligned. Use tacky PVA glue applied with a cocktail stick.
5 Thread a brad through a brad mat and insert it through the hole in the pocket front.
6 Glue the front flap to the side edge of the back, aligning edges.
7 Thread a brad through the remaining brad mat and tie on a piece of craft thread behind it. Fasten to the top flap.
8 The pocket is now finished. Pop the pillow box closure at the base.
9 Make as many pockets as desired and thread on to a book ring. I always think and odd number is more pleasing.
What will you store in yours? Brads, buttons, whatnots....
I have a thing for scarf prints, and bandanas are having a moment (not that they ever disappeared). Soo - here's a handy pillow gift box decorated in a bandana design.
Like all pillow boxes, it is a cinch to make. Just one flap to glue, pop in the ends, and you're good to gift.
Here is your free printable papercraft. Make by hand (.pdf) or digi-cut (Silhouette):
BandanaPillowBoxRed.pdf
BandanaPillowBoxRed.studio3
I've given you two sizes for the cutting file. The larger size is 20% bigger.
Enjoy.
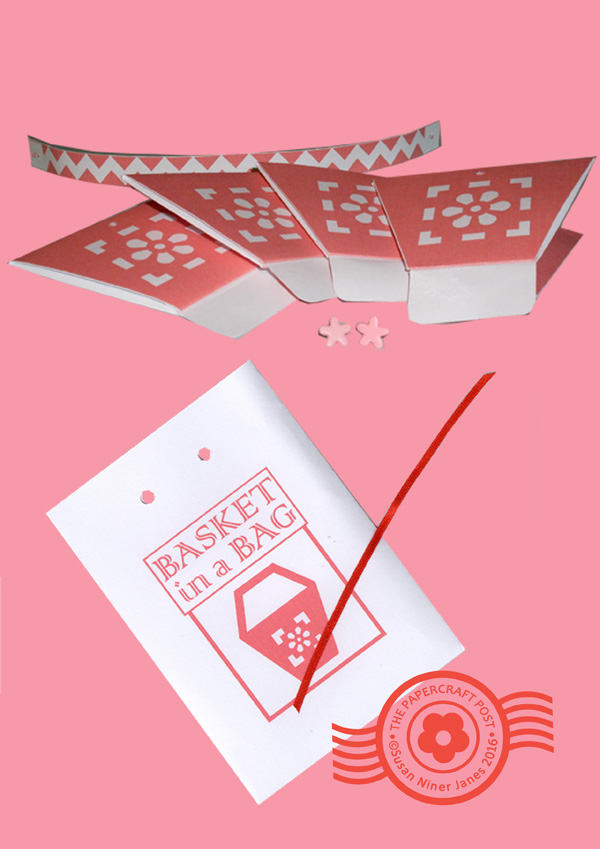
Here's a fun idea inspired by the modular origami boxes of Tomoko Fuse- a flat-pack basket in a bag. The basket sides slot together, then a handle is added. These baskets would be just great for a child's craft activity party (over three - brads included). The party guests could make the baskets, then fill them with goodies.
Here are your free files, hand-cut or digi-cut (Silhouette):
BasketinaBag.pdf
BasketinaBagBag.pdf
BasketinaBag.studio3
BasketinaBagBag.studio3
Basket in a Bag
The basket sides are partially assembled - and folded compactly - before placing in the bag. Crease the folds and stick the base flap, making a channel. For each basket, you need two sides with handle holes, two without. You also need the handle (two contrasting strips, glued or d/s taped back-to-back) and two brads. The base liners are optional.
To assemble the basket, slide the tab into the channel of the the adjacent side. Alternate the sides with the handle holes with the plain sides. To make the basket base, fold down the bottom flaps consecutively, tucking the last side under. Attach the handle with the brads. You can pop in a base liner as a decorative feature.
To seal the bag, you can use a 20cm (8in) strip of 3mm (1.8in) ribbon or the narrow paper strip provided.
I prefer the cut-out version of the basket - much more elegant. However, for a super-easy basket, no need to cut out the motif.
The baskets can be disassembled just as easily as they are made. If you want to make the basket permanent, glue a base liner onto the basket bottom. (You will have to glue on the base liner as a reinforcement if filling the basket with heavy contents. You can glue a base liner inside and outside, if required.)
You can post these baskets along with Easter - or birthday cards.
I'm on a pillow box binge. Everybody likes them (check out last week's post Pillow Box Pockets . ) They are easy and fun to make (a wow moment when the construction puffs up, if you are a papercraft geek like me).
Today I thought I'd make a gift purse - flap closure. (You don't always have to use the pillow box sides as the openings.)
Okay. Purse designed. How to decorate it? I was browsing through Kerry Richardson's excellent book, Celtic Calligraphy
(reviewed here earlier in the year) - and I thought I'd have a go at designing Celtic knots (digital style, that is). I worked out a hearts entwined motif and a twisted border - the learning curve wasn't too steep. Will have another go soon.
Soo- here's the purse. (I've included a gift card enclosure, too.)
CelticKnotPillowPurse.pdf
CelticKnotPillowPurse.svg
CelticKnotPillowPurse.studio
Very easy to make - no tut required. Print, cut, score the folds. For super-sturdy holes, glue the reinforcements behind. The purse front pillow box folds (the marquise shapes) belong on top. For the handle, thread a ribbon through the holes and knot ends inside the box. A sticky dot makes for a re-sealable flap.
It would be appropriate to inscribe the gift card using a calligraphy felt-tip!
I'm not done with pillow boxes. I am keen to try a slide-close design...
Today's project is brought to you courtesy of my breakfast oat pot - the tear-strip to remove the outer packaging for recyling sparked the idea. I thought it would be fun to do a card with a tear strip - secret message revealed underneath. So - here it is. Interactive, with amusement value!
Here are your free printables:
SecretMessageValentine1of2.pdf
SecretMessageValentine2of2.pdf
SecretMessageValentine1of2.svg
SecretMessageValentine2of2.svg
Of course, it is preferable to make this card on a digital cutting machine (with the .svg file). The tear strip perforations are pretty fiddly to cut out with a craft knife. Aside from cutting the tear strip, making the card is a doddle. The front cover is fixed onto the card blank like so, using strategically-placed strips of d/s tape:
Remember to remove the little piece of paper to the left of the tab on the tear-strip (shown above). Print the card liner on thinner paper - cheap-o photocopier paper will do (the card itself is made from 160gsm photocopier card). When presenting the card, I like to raise the tab just a smidge as a prompt.
And of course, you can edit the text to customize your secret message.
Have fun!