More coordinated bandana gift packaging (check out the ice cream cup). Today's project is a pretty gift container - another of my hybrids. It is a combination of a tied-corner tray and a pizza box. It ramps the scarf-print effect up one level and makes for distinctive re-usable gift packaging.
Here's your freebie design (hand-cut or Silhouette digi-cut):
BandanaGiftBox.pdf
BandanaGiftBox.studio3
Making the the gift box is pretty easy, so I'll just talk you through a few pointers. As you can see, it prints up on a single sheet of A4 photocopier card (160gsm). If cutting by hand, you will have to punch the holes with a 1/8in circle handpunch and the lid slits with a craft knife. Glue the corner reinforcements onto the wrong side of the box.
Score the folds - on the base: the base square and diagaonals to each corner. Score the fold lines for the lid. Crease the folds. Bow-tie the box corners - 25cm (10in) of narrow ribbon for each. To make the lid, slide the tabs into the slots.
When the box is finished, plump up the corners for a more scarf-like appearance.
This box would make ideal packaging for a bandana-print scarf! :)
I haven't had any makes on the blog for a while - so I thought I'd resume my batch of festive decs for 2014. I love all things Milk Carton, so today I have for you Milk Carton Bell ornaments. They are mostly fun and decorative - but if you attach a jingle bell as a clapper, you will make a gentle noise:
A button or a pony bead can also serve as a clapper - low-noise variety.
Here are your freebie files:
MilkCartonBellRed.pdf
MilkCartonBellGreen.pdf
MilkCartonBellBlue.pdf
MilkCartonBellRed.svg
MilkCartonBellGreen.svg
MilkCartonBellBlue.svg
The bells are a cinch to make. Cut out the pieces, punch the top holes (1/8in circle punch). Score, then crease all the folds. (All the folds are mountain folds, apart from the top flaps and the indentations at the sides, which are valley folds.) Join the sides, alternating tall and short sides. (Use either PVA glue or d/s tape.) Loop a piece of string, tie on the clapper. Thread the clapper though the top hole, then secure the bell top, pressing sides together. Make a hanging loop with the remainder of the bell string. I like to add beads to the string tails.
The bells can be used as tree ornaments, or as hanging features on paper chains.
 |
| Three colourways. |
 |
| Two sizes. |
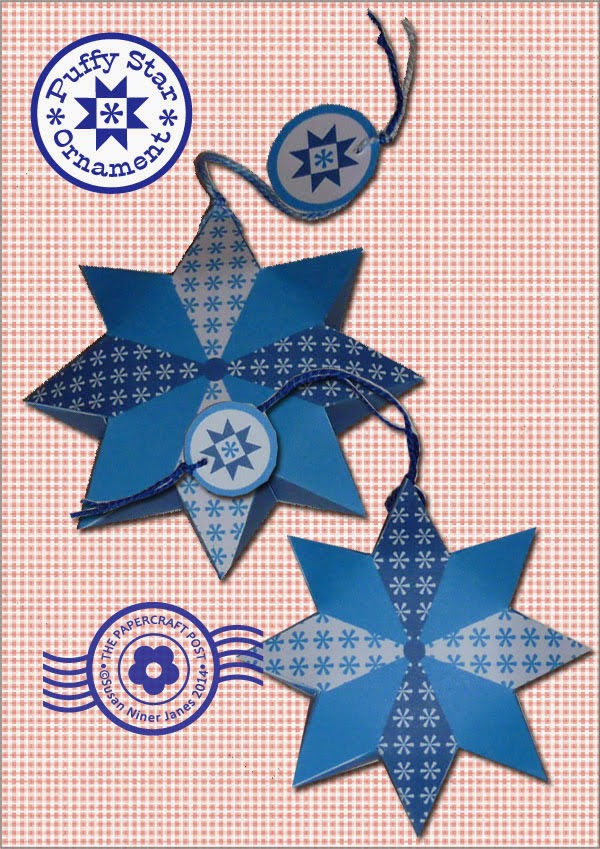
Xmas on the 4th of July! Yesterday's project - using the same patchwork star motif - was a cinch. Today's 3-D patchwork stars are more challenging to make - in a good way. Each ornament is made of two interlocking pieces. It is fascinating to see how the star points join in a zig-zag configuration. And when you are done, you've got a very attractive decoration that looks just great either solo or in groupings.
Here are your printables-
Hand-cut:
PuffyStarsBlue.pdf
PuffyStarsRed.pdf
PuffyStarsGreen.pdf
PatchworkStarCharms.pdf
Digi-cut:
PuffyStarsBlue.svg
PuffyStarsRed.svg
PuffyStarsGreen.svg
PatchworkStarCharms.svg
I've given you two star sizes, with the print positioning different in each to add variety when grouped. The charms are the same as for the
Patchwork Star Matchbox Ornaments, so they will co-ordinate perfectly.
Now I'll talk you through the making-up:
 |
| Crease folds as above. |
Okay. You've got your two star pieces, front and back. Score the folds and crease them as shown in the pic above. All the folds are mountain folds, except for the little tabs at the base of the star-front triangles - these are valley folds... in the valleys between the star points.
 |
| Start at the top. |
Use tacky PVA glue to join the star together securely. Apply it with a cocktail stick. Start gluing at the star apex (where the hanging holes are). Make sure that you have positioned the front and back star pieces correctly, with a hanging hole to either side of the apex.
The stars join together in a zig-zag formation:
One side up, next side down, front to back, back to front - all around the star. Make sure that the little inter-star tabs are placed underneath the adjacent flap.
Pic above shows gluing an flap upwards. The adjacent flap has been temporarily folded back out of the way to allow clear access. (You can see one of the little triangular tabs just below the bent-back flap.)
Above, the flap that was bent back in the previous pic has been bent downwards and glued in place.
 |
| A look inside. |
Above, an inside view of the star (looks like a clamshell - or Audrey II).
I like to star gluing at the star apex, go partially the way around, then return to the apex and proceed in the opposite direction. I then complete the gluing at the bottom of the star. This ensures that the star
apex is all neat and tidy.
If you want to add the element of sound, pop a jingle bell inside before you've finished gluing.
Star's finished now. Just add the hanging loop and charm.
Remember that these Puffy Stars are designed to co-ordinate with the
Patchwork Star Matchbox Ornaments:
I have some fancy folding for you today - 3-D Celtic Knot Embellishments. They look great in gold glimmer paper. The knots look impressively intricate - but you can learn to fold them with just a little practice. The basic knot shape is of one-piece construction, which is convenient --- and a nice party trick! All the knots work on the same principle: fold the "arms" to the centre, then swing the free side to the back. You can catch a hoop in the loops for an extra-fancy touch - loop-de-loop deluxe.
Print the Celtic Knots template onto the wrong side of the paper, then cut and fold. There are tutorials for each shape of knot.
There's also a download for a bag topper. The idea is that a cello pack of Celtic Knot embellishments would make a welcome gift for a calligrapher or card-maker: 3-D illuminated manuscripts!
Fix the knots onto your project with sticky dots.
Here are your downloads:
CelticKnots.pdf
CelticKnotBagTopper.pdf
I've done tutorial sheets for the three knot shapes - the squares, the trefoils, and the hearts:
If you'd like to learn how to design your own 2-dimensional Celtic Knots, these books by Sheila Sturrock are great:
Celtic Knotwork Handbook
Celtic Spirals Handbook
Both books are from GMC Publications Ltd. Neither title is new - but they are worth tracking down. The first title is available used and new, the second is still in print. Each title de-mystifies the process of drawing Celtic Knots in a clear and user-friendly manner - and throws in a bit of history to boot. The books are intended for pencil-drawing, but if you've gone digital than the geometric principles still apply, of course.
Have fun illuminating your manuscripts, gifts, or cards.


