


 | |
| Print, punch, pleat! Make snowflake rosettes as ornaments or as a cascade. |
The snowflake design is engineered to coordinate with two styles of Tonic Simplicity Pattern Punches - either the Scalloped Diamond design (Item 962e) for a more geometric look or the Victorian Border (Item 963e) for a lacy edge.
Just download a file below and print them onto plain white copier paper - then you'll be good to go with the tutorial. Choice of .svg, .jpg, or .studio file:
https://dl.dropbox.com/u/27130011/SnowflakeBordersSelect.svg
https://dl.dropbox.com/u/27130011/SnowflakeBordersSelect.jpg
These files are meant to be printed. They are not cutting files in the case of the .studio and .svg files. They should fit exactly onto an A4 piece of copier paper.
Now for the tutorial:

1) Print the snowflakes and cut out the individual pattern bands. For the smaller size snowflake, remove a strip 1cm (3/8in) wide from the bottom edge of the snowflake. I'm using scissors, but a paper trimmer is even better for the job.


4) Punch the pattern band halfway (7 punches), then finish punching the band in the opposide direction (6 more punches).


6) Trim the ends of the punched pattern band.


8) Accordion-pleat the pattern band as shown, aligning your folds with the punched scallops.


11) Tricky bit! Flatten the pleated crown, points to the outside. Ease the pleats into position so the ends meet at the centre. Don't let go!
You should also have on hand a 2.5cm (1in) paper circle with a hole pierced in the centre.

12) Carefully turn the rosette over and glue the paper disc onto the centre.

13) Now turn the rosette over once more and adjust the pleats. Make sure they meet at the centre and that the creases are sharp.

14) You can weight the rosette with a punch as the glue dries. The punch shown is from Tonic Studios Petal Pairs Box Set 4 Item 883e. When the snowflake rosette has dried, use the punch to cut out a Petal Pair flower from white paper. Pierce a hole in the middle of the Petal Pair flower. You can use any punch in the Petal Pairs range to make the snowflake rosette centre.

15) With a sewing needle, thread a bead onto a piece of soft embroidery cotton or craft thread (white). Slide the bead to the centre of the thread.

16) Switch to a tapestry needle and thread both thread ends through the eye. Thread the bead through the centre of the Petal Pair flower.

17) Knot the thread on the back of the rosette. Trim ends.

Here's how to make a hanging snowflake rosette ornament:

1) You need two completed snowflakes. On one snowflake, thread a hanging loop. (Use a needle to thread a loop of string through the cardboard circle.) Knot the hanging loop near the end. On the centre disc of the other snowflake, stick a Dodz 3D Adhesive Dot by 3L Scrapbooking Adhesives.

 | |
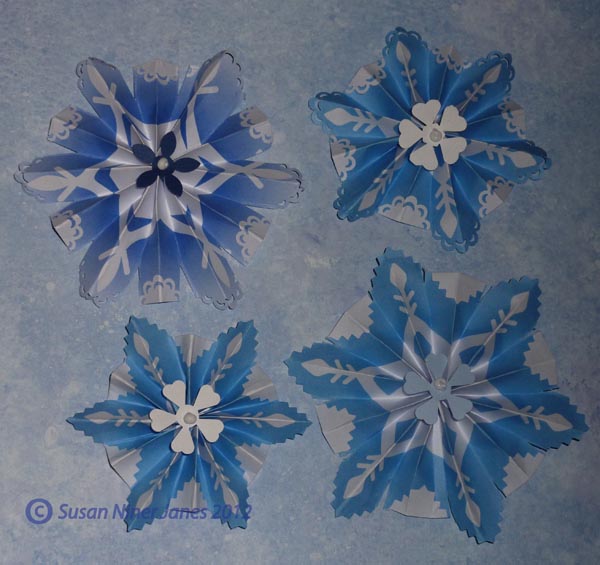
| Completed snowflake rosette ornaments. Double-sided for hanging! |
That almost does it for the Snowflake Rosette workshop. Just a few fine points and extras:

If you are making the larger size of snowflake, you must clip into the folds for ease like so (above).
 |
| Big and little snowflake sizes contrasted. |

(Don't make a horizontal chain - the snowflakes will twist.)
 |
| Petal Pairs "Centre Perks" make pretty snowflake centres. |

To fold the Centre Perk: fold the top petals to the centre; open them back out, then fold them down consecutively, tucking the last petal in.
And of course, you can make pleated rosettes from other papers besides the snowflake printout. Great all year round.
Thanks to Leah for taking the pics. Gratitude and cheesecake to you.
Gorgeous snowflakes - will definitely be having a go at these. Thank you so much for the inspiration - and the download.
ReplyDeleteBeryl xx
These are gorgeous love the snowflakes. Caroline xxx
ReplyDeleteThanks, guys. Stay tuned for paper chains. And there will be more downloads, now that I have figured out how to do it! :)
ReplyDelete