Tuesday 22 May 2012

Paper String Bags

Posh pastels with "leather" handles.
"No-frills" brights from notepad paper.
Holiday weekends are coming up - in a summery mood - so here's a sunshiney project idea. These fun-to-make party favour bags are inspired by string shopping bags - those expandable net ones that come in rainbow colours. I'm thinking atmospheric markets in faraway places...  You can give a paper string bag in place of a Bon Voyage card - nice, because the recipient gets the enclosed treat, plus your good wishes.

To create the net effect, you cut a paper lattice - a pattern made of rows of staggered slits, like an openwork pie crust. Choose paper that has some give - thin enough to stretch, but that doesn't tear easily. Use a craft knife held against a metal ruler to cut the slits, and use a protective mat underneath. The pattern outlines can be cut with scissors. 

Tip: print the pattern on the wrong side of your paper, then cut out. Set your printer on draft quality to reduce show-through on the other side of the paper.

Here's the bag pattern:

You can cut constrast handles out of heavier cardstock, if desired - I used Bazzill Basics with a nice texture to it. Fix the bag handle onto the bag top with a glue stick or double-sided tape. Fold the bottom tab under and join the two bag pieces together at the base - I used double-sided tape. Fold the side tabs under and glue bag front to back with thinly-applied tacky glue. The handle tabs can be glued in place with double-sided tape. When the glued side tabs have dried, work in your bag a little - gently stretch the lattice, flexing it to create the net effect. Pull it downwards - don't be afraid - the construction is surprisingly robust.  Now you are finished - just add the gift tag.

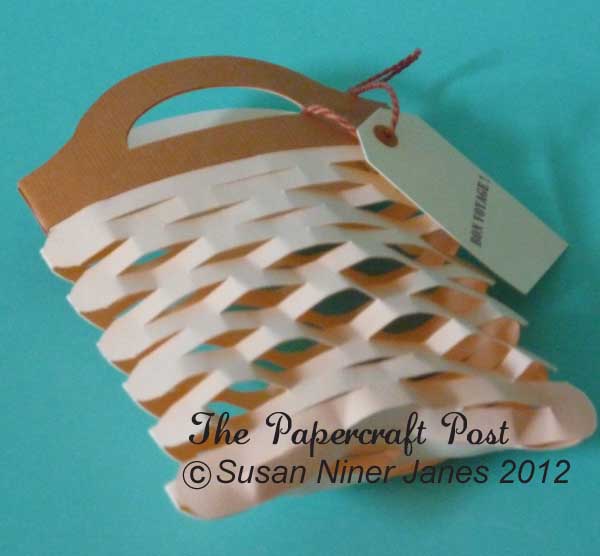
The paper lattice looks like net.
Basketweave-look - but nothing to weave!

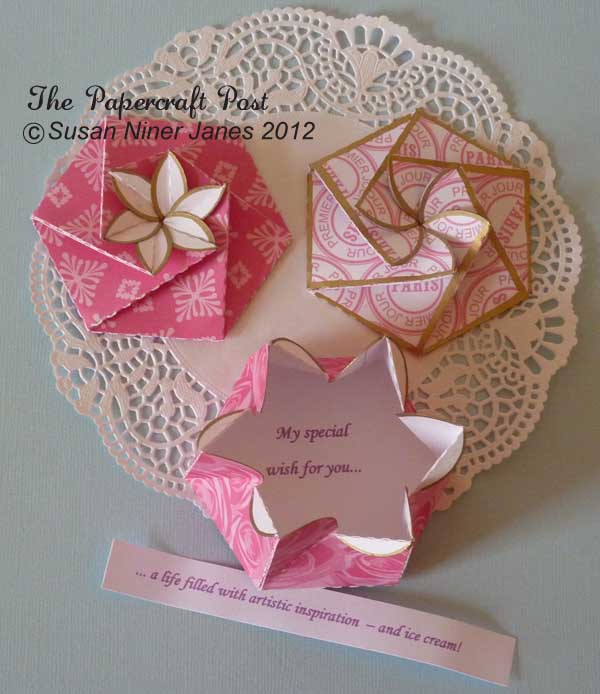
For easy-make versions of these mini-gift bags, omit the slits. You can leave the bags flat, or crease horizontal folds for an accordion effect.

Thursday 17 May 2012

Swivel Tags

Pull the cord to reveal a message!
These cute mini-tags are based upon swivel-mechanism pocket magnifying glasses - you know - think retro - they often have "genuine leatherette" covers.
Currently, computer memory sticks often have an attached protective case that works this way. These tags are perfect for when you want to give a gift with a personal inscription that you don't want to broadcast to the whole world. They also make good dinky cards - everybody loves the surprise factor. 

Of course, you can enlarge the tag design to make a bigger novelty card.

Mix and match the tags and covers.

 Here's the template for the tags. There are four different tag designs, three different covers, and a selection of brad mats. Combine them as you wish.
The tags are simple to make. Fold the cover in half - make a soft fold. Thread a mini brad through a brad mat. Sandwich the tag in between the folded cover.
Pass the brad through the hole and spread the brad wings. For the cord pull,
use a tapestry needle to thread a loop through the tag hole, pass the thread ends through the look to make a half-hitch knot. Thread beads on each cord end. Knot below each bead.


I've outlined the covers and cover messages with Tim Holtz Distress Markers (any excuse to use them!). The cord is craft thread. Holes have been punched with a 1/6" circle hand punch.
 
Paper: London Market by Pink Paislee.

Monday 14 May 2012

Papercraft Yo-Yos

Yo-yos or Suffolk Puffs - they're fab whatever you call them!


My papercrafts are often inspired by needlecraft techniques. And I have always
adored yo-yos (Suffolk Puffs in the UK) bigtime! Those gathered fabric circles are so sweet and fun to make. So... here's a simple method to make them up in paper. They look a lot like the real thing. 

Here's the pattern:


I've given the yo-yos to you in graduated sizes. I've also supplied leaves and optional flower-shaped backing mats. But I like them best just plain - that shows off the gathers to best effect. 

To make a paper yo-yo, cut out the 8-petalled shape. Piece or punch the holes as marked - a 1/16" circle hand punch does the job perfectly. I've used 150gsm scrapbooking paper. Fold each of the 8 petals at the base - a soft fold, not a sharp crease. Next, shape each petal over your finger to gently curve it inwards. (The more carefully you do the folding preparation, the more realistically fabric-like your yo-yo will be.) Thread a tapestry needle with some craft thread. Stitch through the holes so that there's an under stitch through the right side of each petal. Now for the fun bit: gently pull the thread to gather the flower. Make sure the sides of each petal fold inwards. When you've drawn up the yo-yo, tie a knot tightly in the centre. Leave thread ends.

You can stitch through to the back of the yo-yo - leave thread ends which can
be used to secure a bead or paper leaves. Or, you can tie a bow at the centre front yo-yo.
Cut, shape, stitch, gather: yo-yo!


Tip: you can fine-tune the look of the yo-yo gathers by gently prodding the
folds with the tip of a tapestry needle. Poke the sides of each fold under. You can also reach into each petal to smooth it from the inside if necessary.

The yo-yos make great embellishments on cards or for gift-wrapping. If you want to add leaves to enhance the flower look, crease a centre fold on each leaf shape using an embossing tool and a straight edge.

I made some simple cards featuring the yo-yos, starting with a 15x15cm (6in x 6in) card blank. Here are the patterns for the backing mats:

If you come up with a fun idea for using your paper yo-yos, please share it here. Thanks. You might want to experiment with different types of paper - for example, crepe paper would produce more fabric-like gathers.

Stuff I used: Dovecraft Back to Basics III paper for the yo-yos, Bazill Basics cardstock for the card mats. Craft thread for stitching the yo-yos, soft embroidery cotton for stitching the backing mat.

Friday 11 May 2012

Wish Pockets

Pretty party favours: enclose a wish in the swirly paper pocket.
I still haven't gotten those lovely Moroccan purses out of my system (two previous blog posts - Petal Pockets and Paper Moroccan Purses, both on May 7, 2012). I really wanted to give you the designs for the curved style petal pockets with 5, 6, and 8 sides. So here they are. You can use them as party favours, card focals, or memory pockets. Handy for tooth fairy surprises. It's nice to put a wish inside, or charms, or small sweets. 

6-sided pockets, flower centres and no-frills.


6-sided pockets, open and shut.

You can make the pockets up with the flower centres - or, for the no-frills version, just don't turn back the diagonal corner fold. You will still get a lovely centre swirl - but it will be simpler. If you do go for the flower centre, make sure you fold the diagonal corner before you swirl the pocket shut. If you choose to make the no-frills version, it is nice to accent the edges with a gold felt tip. (You can add the gold outlines after the pocket is folded if you slip a piece of folded scrap paper under the edge you are colouring.)


I've supplied you with pattern for the larger size (most pockets are about 8cm/3in across) - but you can enlarge or reduce the patterns on a photocopier as desired (as for the dinky pockets in the top photo). If making the flower centre style, choose double-sided paper for best effect. Don't choose bulky papers. Origami paper is an excellent choice, since folding is required.


No-frills: 5 sides and 8 sides.
Here are the patterns:


6-sided curved top Moroccan purse.


There you have it. A panoply of paper pockets. Now all you have to do is chose sides - 4, 5, 6, or 8 - which do you appreciate? (4-sided pockets in previous posts.)


Stuff I used: Craftwork Cards papers, Pilot Super Color Gold Marker.


Monday 7 May 2012

Petal Pockets

Pretty petal pockets: Moroccan purse makeover.
Following on from my previous post, Paper Moroccan Purses (7 May 2012), here's a simple spin on the design that changes its look entirely. The 4-sided purse pattern has been slightly tweaked - a curved top edge has been added. To create the petal effect, assemble the purse in the usual way, then crease back the upper right curve in each quadrant. So easy! A gold marker outline has been added for definition - add this on the wrong side of the paper, before assembling the pocket.

These pockets are dainty and feminine - so make them up in pretty double-sided papers. Each pocket opens and closes in exactly the same way as an ordinary 4-sided Moroccan purse pocket (untwist/twist).

Here's the pattern:
The diagonal line across the top curved edge is the petal fold.


For an alternative - flatter - look, these pockets look fine without the folded petals. 

Stuff I used: Craftwork Cards papers, Pilot Gold Marker.

Paper Moroccan Purses

Shutter-style paper purses look like the real thing!
Shutter-close Moroccan purses are genius - I've admired them since I was a kid. It's magic when they un-spiral to reveal their contents, then swirl shut securely again. The wow-factor makes these paper purses ideal for giving small gifts to children of all ages. Instead of being made from leather stamped with gold patterns, these papercrafted dead ringers are made from leather-look paper decorated with peel-off stickers.

I've given designs for 4-sided, 6-sided, and 8-sided purses (j-pegs below). All are really easy to make. Here's how: cut out the design in leather-look paper (mark it on the wrong side, of course). Top tip: pre-crease the folds. (The purse sides are mountain folds and the diagonal tucks are valley folds.) Apply stickers to the top and bottom edges. Join the adjacent sides. (You can either apply PVA tacky glue or double-sided tape to the tabs.) Crease the folds consecutively, going anti-clockwise (counter-clockwise) to close. Once the purse is shut, you can add an optional small sticker on each face - the finishing touch stickers are easier to position once the purse is shut. Now you're done! 

Open and shut. Just spiral the folds to close.
 
4,6, or 8: choose sides!
These purses are super-easy to craft, so you can make them up in quantity as party favours. You can also make them up in pretty papers as card focals or as memory pockets on scrapbook pages. Adding a message inside the purse is a fun surprise - remember to do this before assembling the purse.

Stuff I used: Hot Off The Press Peacock paper in red, black, and white available from PaperWishes.com; JEJE Produkt peel-off stickers.