Monday, 1 October 2012

Book Review: The Crafter's Guide to Papercutting


The Crafter’s Guide to Papercutting
Emily Hogarth
Search Press
ISBN – 13: 978-1-84448-895-7
Paperback £12.99
September 2012

Artist Emily Hogarth has written the right craft book at the right time. The craft of papercutting is having a moment – note the well-deserved mainstream mega-popularity of papercut artist Rob Ryan. Why? Papercutting is a craft for hard times. With just a cutting implement and a piece of paper, you can create a thing of beauty. Plus, papercuts have an irresistible graphic appeal.

This is a well-thought-out and beautifully produced book that has a usefulness beyond its lovely projects. The book begins with a whirlwind, worldwide illustrated history of papercutting and continues with a how-to guide for novices. There are tips on tools and materials, notes about paper choice, cutting advice for scissors or craft knife, info on how to transfer design to paper, single and multifold designs, layering and multicutting. Beyond the basics, the chapter on designing papercuts is chock full of practical advice and presents material I haven’t seen before - such as how to get your head around backwards papercutting patterns (they are copied reversed onto the flip side of the paper).  There’s also a section about the importance of positive and negative design elements, which is the nitty-gritty of papercutting.

Emily Hogarth’s projects, which have heaps of personality and playfulness, form the core of the book. The projects have a contemporary feel, while taking on board traditional papercutting styles. Emily came to papercutting via her textile studies – cutting stencils for silkscreen printing. You can see that the project designs have the eye of a textile artist – they have plenty of flow and movement. 

Best of all, Emily has thought outside the box for her projects, not limiting her ideas to the usual 2-D cards and silhouettes. There are lots of 3-D and layered projects, and several projects make use of double-sided paper (a simple, but show-stopping trick).  (The Accordion-Fold Garden Card makes superb use of double-sided paper.) Other projects include a Flying Bird Mobile, a Shadow Puppet Theatre (the puppets have articulated joints), and some sweet cupcake wraps with cake pokes (simple, but effective – do-able in quantity). The zig-zag fold NYC skyline has wow factor, yet is achievable by relative newcomers to the craft. Nice. 
Each project has a step-by-step photo tutorial. A handy feature is the “Take Special Care” corner, which flags potential tricky spots.

The back of the book consists of a template section. The brave can actually cut up the book. The timid and the reverent can photocopy or trace the designs. A nice feature: there are more templates than projects in the book. The “extras” refer you to similar projects in the book for how-to guidance.

My thoughts on Man vs. Machine:  I am a keen advocate of digital papercutting. I couldn’t let a day go by without crafting on my new best friend, my Silhouette Cameo machine. But I still believe that there is a place for handcrafted papercutting. Like the e-book/real book kerfuffle – no need to choose – there’s a place for both. Handcrafted papercuts retain a charm and personality – the maker’s hand is precious. Digital papercutting enables the crafter to create amazingly ambitious papercut projects quickly.

Digital papercrafters will find lots in Emily Hogarth’s book that applies to their craft. Many of the design concepts - such as positive/negative and layering - apply to both hand-cut and machine-cut papercraft designs.  And Emily’s beautiful designs can supply inspiration.


Tuesday, 25 September 2012

Thread Caddy Tutorial

Basic caddy: bird's-eye view (top); straight-on (bottom).

Three styles: basic (left), double-ribbon card (right), single ribbon card (front).
Double-ribbon card style with lidded boxes.
Today's post is part of the Papercraft Fabrications strand of sewing-related papercrafts.

These thread caddies are papercraft interpretations of traditional sewing aides called quilter's dollies. The cotton reels are loaded into the pockets and a ribbon is threaded through them. The cotton reels can then rotate freely as you unwind the thread - very handy. The centre of the caddy can hold pins, needles, thimble. For optimum use of the space on the handle, I have designed some of the caddies as ribbon cards. 

The caddies make wonderful gifts for sewing enthusiasts. The caddy doubles as a useful gift on its own and as attractive gift packaging.

Here's how to make the caddies:
1) Cut out the pieces (pattern templates to follow). You need a centre box, four thread pockets, and a handle for the basic caddy. Score and fold as indicated, using an embossing tool held against a metal ruler.

2) Glue the thread pocket tabs. The tabs on the smaller long side are "outsies". 
3) The tabs on the longer, front pocket edge are glued as "innsies". To complete the thread pocket, glue the long tab and the short sides inside the pocket. Use tacky glue applied with a cocktail stick or ds tape. Important: the thread pocket back flap remains unglued and is folded as a mountain fold. Assemble the three remaining pockets in this way.
 4) Pinch the pockets to get nice, sharp corners.
5) This pic shows the centre box with tabs glued, surrounded by the thread pockets.
6) Attaching the thread pocket, step 1. Glue the underside of the thread pocket back flap inside the box.
7) Attaching the thread pocket, step 2. Attach the back of the thread pocket to the outside of the box. Repeat steps 5 and 6 to attach the remaining three thread pockets to the centre box.
8) This pic shows the assembled caddy base and the basic handle prepared with ds tape. You can glue the handle together if you prefer. 
Note that the bottom triangular tabs are glued onto the base of the centre box.
9) Attaching the handle. The handle sits diagonally across the centre box.
10) Glue reinforcements inside the box sides.

11) Time to load the thread. You need a length of ribbon (about 1cm/3/8in wide) and a yarn needle. Pass the needle through the first pocket hole, pass it through the cotton reel, then insert the needle through the hole on the opposite side of the pocket. The thread is now in its pocket cradle. Repeat for the three remaining pockets.
12) This pic shows first reel of thread in its pocket, needle progressing to next pocket.
13) When all four cotton reels are in their pockets, tie the ribbon ends into a bow. (Note: for a bit of extra embellishment, you can thread a couple of pony beads onto the ribbon in the between-pocket gaps. Of course, this must be done as you are threading in the cotton reels.)

That completes the no-frills thead caddy. You have other options. Here's how to make the version with the triangular pockets:
This pic shows the pattern piece for the triangular box. Be careful to crease the folds allowing for the top lid overlap! Cut out two boxes.

This pic shows one assembled triangular box, and one about to be taped together.
The top of the box takes a brad backed with a brad mat. On the bottom of the brad mat, glue two spacers as shown. This allows you to wind the thread with room to spare - for easy closure.

This pic shows the brad (with mat) inserted in the box lid.

The boxes are fastened with ties. Pierce two holes at opposite corners of the centre box. Use a yarn needle to insert craft thread ties through the holes.
This pic shows the box and tie in place.
 This pic shows the tri boxes about to be placed.

Box open. (Audrey ll, I know.)

Your other option is to make lidded boxes - then you can use the compartments for items other than thread. The back flaps of the box lids are glued inside the centre box sides, as for the thread pockets in Step 6. The boxes are fastened with matted brads and craft thread ties.

Here are your pattern templates:


So, there you have it. Boxing clever - quilter's dollies, thread caddies - whatever you call them, useful Papercraft Fabrications for your sewing convenience. Fun to make, I might add!

Mega-thanks to my daughter, Leah, for taking the photos. Patience during the mini-marathon photo-shoot greatly appreciated!

Stuff I used: the card is from my stash (weight about 160 gsm), ribbon from www.craftfairy.co.uk

Thursday, 13 September 2012

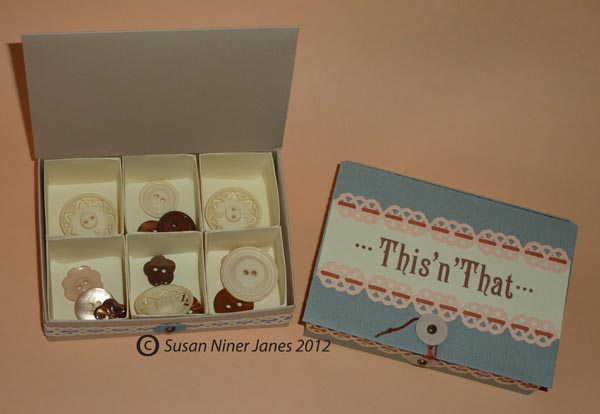
Midi-Cigar Box Haberdashery Stash

Fun storage: stack 'em high.
A functional box reveals...
... even more functional compartments.
Paper-punch lace trim keeps things pretty.
Modular storage compartments... have them your way! (Divisions of 6 shown.)

Divisions of 4.
 
 2,4,6... choose the mix! Just some of the possible box compartment combos. But you might just want one storage space:


Last week's project was a cantilever sewing box. The top compartment was a cigar box. I thought that it'd be handy to size the box up and add really useful storage divisions. Now there are lots of options for storing your bits and pieces. And as projects go, it is pretty easy!

Cigar boxes are sturdy, practical, and shabby chic. The ideal place to store your button hoard or other small treasures. Great as gifts!

These are half-sized cigar boxes, so although I have called them "mini", they are actually "midi" - and they can hold plenty of stuff. Small enough to be cute, but capacious enough to be useful.

The cigar boxes are all decorated with paper lace made using Tonic Studios Simplicity Geared Pattern Punch, Doily Strip Pattern (item 966e). The geared punch cuts like butter, so punching a strip to fit round the cigar box is a cinch. The basic doily lace pattern is pretty on its own - but you can craft a variety of lace effects just by scissor-snipping and weaving in a strip of 2mm (1/16") quilling paper.
Tonic doily punch: basic strip (top), lace variations achieved with scissors.
To create a wider band of lace, glue the strips together with tacky glue applied with a cocktail stick. Carefully align the holes when you glue, and you will be able to lace through them with a strip of quilling paper to conceal the join. 
The peek-a-boo diamonds are created simply by lacing the quilling strip round and round across the width of the paper ribbon.
Brad-wrap closure. Spacers under the brad give lift, so wrapping is easy.

Tie closure (less secure than brad-wrap, but pretty).
I have concentrated more on the box decorations this week because making a cigar box is pretty straightforward.  Having said that, there are a few things to remember when constructing your cigar box. After cutting out, score all folds with an embossing tool held against a metal ruler. A bone folder is handy for making crisp folds. The cigar box lid is made separately from the base. Add the brad to the lid before assembling the lid (you glue down the flaps inside before sticking top to bottom - the lid is a double-layer sealed unit). Decorate the base before inserting the brad and folding the flaps inside. Attach glue or double-sided tape to the outer side of the lid flap before joining it to the inside back of the base.

Note: if you want a tutorial on basic box construction, take a look at Sept 4th's blog, the Cantilever Sewing Box http://thepapercraftpost.blogspot.co.uk/2012/09/cantilever-sewing-box-tutorial.html - the fold-in sides construction technique is similar to the method used for the Midi-Cigar Box. The fold-in flaps make a durable box - and they also conceal the construction tabs for a tidy finish.

The typeface I used is Campanile - it is available from Dafont.com. The label panel measures 11.5 x 4cm (4-1/2 x 1-1/2in). Centre it on the box lid.

Here are your pattern templates:

Stuff I used: Tonic Studios Simplicity Pattern Paper Punch (Doily Strip, 
966e).  Bazzill Basics cardstock for the cigar box itself, Inspire Me Premium Paper for the compartments. Don't forget the mini-brads and the craft thread for the closure. If you are wondering about the prop buttons, they are a mix of Jenni Bowlin Studio Vintage Style Sew-On Buttons and Doodlebug Design Boutique Buttons.

Take it from here: just a reminder that a cigar box lid provides creative space on both front and back!

That's a wrap. Plenty of time to make zillions of these by Christmas!