Showing posts with label Papercraft Fabrications. Show all posts

Thursday, 17 January 2013

Papercraft Sewing Accessories Gallery

Quilter's dolly and spools.
Teabag-style thread cards and storage baskets.

Ribbon hangers. Gift presentation idea!
Pin storage: wheels or fans.
Ribbon winders, Flower Garden Ribbon Reels (and basket).
Button storage. The mini cigar box has compartments, like a printer's tray.
Storage caddy and bead trays.


Cantilever sewing box and spools. Yes, the spools are papercrafted!

Today's blog post is part of my Papercraft Fabrications strand - papercrafted sewing accessories: it makes so much sense to papercraft practical, pretty projects that have a life beyond gift presentation. No how-tos here - just plenty of inspiration.

I have a few more ideas for papercrafted sewing accessories, and I'll be posting them on the blog.

Wednesday, 21 November 2012

Fan-Shaped Needle-Threaders Tutorial

Today's post - Fan-Shaped Needle-Threaders in a matching storage matchbox - is part of my Papercraft Fabrications strand - papercraft sewing accessories. And it is also my very first full-colour printable project for you to cut out and assemble. And my very first cutting file download. (The choice is yours.) It's great to make a papercraft project that has a useful purpose - but that still retains the fun factor.

Each needle-threader is made of three layers of cardstock and a loop of
beading wire. To thread a needle, guide the wire loop through the eye of the needle, insert the thread through the loop, then pull the threaded loop through the needle: voilĂ  - a threaded needle. Very handy for the reading glasses generation. Or if you are working in poor light.

Pull the threaded loop through the eye of the needle.
Here is your printable project:

Just print it out, full-size, on a piece of A4 cardstock. I used American Crafts 12 x 12 cardstock that I cut down to A4 size. The cardstock is printer-friendly, folds nicely, and it has an attractive canvas-like texture. Cut out all the pieces. Scissors will do for cutting the edges. You will need a craft knife and a cutting mat for cutting the slits in the centre layer of the needle-threader fans. (It is easier to cut the slits before cutting the fans out of the paper.)

Here's how to make the needle-threaders:
Raise the fan slits using the blunt end of a needle.
Cut a piece of beading wire with scissors; fold a loop.
Pass the loop through the slits; tape down trim excess wire.

Apply tacky glue to the taped side of the fan; glue onto fan bottom layer.
Apply glue to the other side and glue on the top fan layer.
Smooth all three layers together to achieve a good bond.
That's how to make the needle-threaders. Now here's how to assemble the matchbox:

The drawer is lined with contrast paper.
Matchbox printable: cut out and folded. Plus two brads for the drawer-pulls.
The long sides of the drawer must be folded in half lengthwise.
Just one overlap to stick to make the slipcase (use glue or ds tape).
Drawer: stick all four of the long base tabs first.
Next, apply tape to the end flaps and tabs. Carefully stick them down.
The long flaps are the last to stick down.
Carefully smooth the sides.
Insert a brad on either end and spread the wings.
Finally, insert the drawer.


There's room in the matchbox for a reel of sewing cotton or two - and a packet of needles, in addition to the needle threaders. Very handy.

Thanks again to patient Leah, for taking the pics.

Monday, 12 November 2012

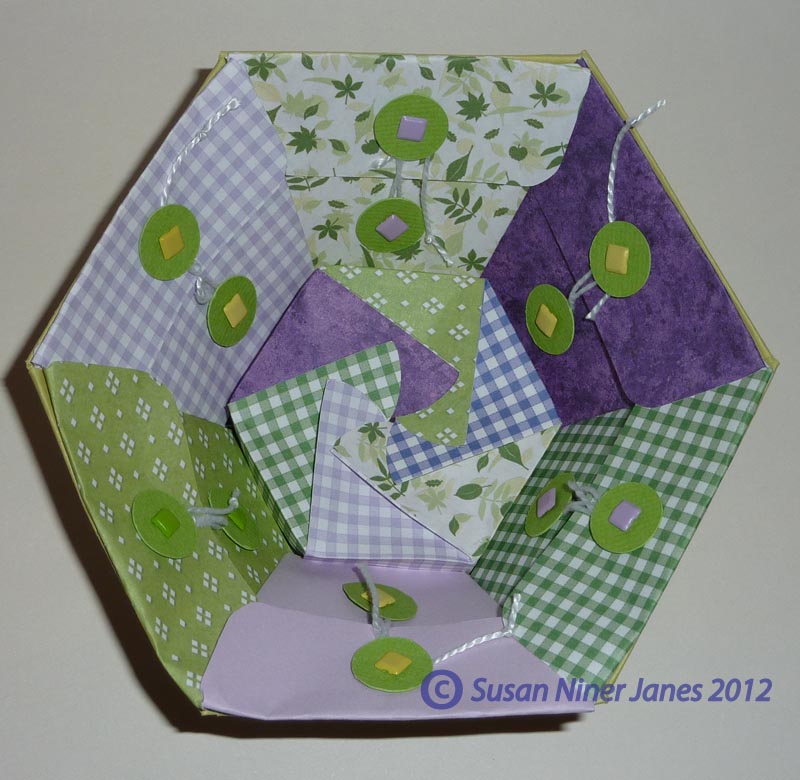
Envelo-Basket

Pockets on the outside...
...and a patchwork pin box inside!
The pin box fits neatly in the basket base...
... and can be removed for easy access.


Today's project is part of my Papercraft Fabrications strand - papercrafted sewing accessories. This bowl-style hexagonal sewing basket has plenty of storage for small haberdashery items - buttons, snaps, etc.- in the outside pockets. In the base of the basket is a swirl-close pin box. Choose different-coloured ditsy prints for the pockets and the pin box sides to create a patchwork look. Fun to craft - and it makes a great gift to give.

Here are your pattern templates:
The pattern templates given are for A4 paper - but if you can big them up by 20 per cent, that makes a nice-sized basket which fits onto 12 x 12 cardstock. I recommend Bazzill Basics for the basket and lighter-weight printed paper for the envelopes (the small prints are from Craft Creations). 

Basket: score all the fold lines with an embossing tool held against a metal ruler. Glue the little base tabs inside and the side flaps outside. Glue the top flaps onto the outside (this creates a classy rolled-style edge).

Envelopes: cut 6 in different-coloured prints. Emboss all the folds - but not the top flap, which should be folded as a soft fold. Insert the brads (with brad mats) before you fold the envelope. The accordion folds at the side fit inside the body of the envelope - but the side flaps should be glued to the outside of each envelope. Tie a craft-thread string onto the top brad for the wrap closure.

Attach an envelope onto each outside face of the basket. You can use either tacky glue or double-sided tape. 

You may prefer to attach the envelopes inside the basket, in which case you should reduce the envelope pattern by about 2 per cent:
 (If you are mad about patchwork storage pockets, you could attach pockets both inside and outside the basket...)

To make the pin box, cut out six pattern pieces from different prints, and also the piece for the base (a hexagon with flaps). Score the folds. 
Glue the box body pieces side-to-side. Crease all the folds. Glue the main pin box unit into a ring, then glue on the base. Smooth the base tabs in place from the inside of the pin box.

Here's how to fold the pin box (the "magic" is in the diagonal folds). Just swirl the flaps consecutively to shut the box top:
The pin box is fun to make up on its own - makes nice packaging for small jewellery gifts.

Have fun making your paper patchwork sewing baskets...

Saturday, 6 October 2012

Petal Pairs Ribbon Reels & Gift Basket Tutorial

Flower-shaped ribbon reels and a presentation basket.
Today's project is part of the Papercraft Fabrications strand of sewing-related makes. 

The garden trug-style gift basket holds about a dozen dainty ribbon reels. Makes a lovely gift. The self-adhesive tab to secure the ribbon end is disguised as 3D leaves.

Here's how:
 

1) Cut out the pattern pieces (templates below, at end of tut). For each ribbon reel, you need the top and bottom reel drum, the reel barrel (drum side band - with the teeth), the flower top and bottom, and the leaf tab. 

Prep: Pierce a hole at the flower and circle centres - very important - this is used to align the pieces. Score across the length of the drum side band just below the teeth with an embossing tool and fold the teeth inwards. Cut the swirl slits on the flower top with a craft knife (use a mat). Bend the swirl slits upwards to form the 3-D flower shape. Chalk the edges of the flower top and bottom. (Bazzill Basics cardstock used - good weight, nice texture.)


 2) Glue the side tab of the drum band and join the band into a ring.


3) Pencil around the drum sides, to make placement circles on the wrong side of the flower top and bottom. Centre the circle on the flower by placing a cocktail stick through the centre holes.

4) Apply tacky glue around the outer edges of the drum circle. Glue onto the folded "teeth", aligning edges. Smooth in place. Flip the drum over.  Apply glue to the second circle and glue it onto the other side. The drum is now complete. It is a sealed, flat cylinder.
 5) Glue drum to flower bottom.


6)  Apply tacky glue onto the centre of the flower top and in a ring outside the petals. 


7) Glue the flower top onto the drum top. Use a cocktail stick to position the flower, matching the centre holes of flower and drum. Align the petals so top scallops match those on the bottom flower. Make sure that the flower petal cut-outs do not get glued down. Note the peek-a-boo effect: the colour of the drum can be seen through the flower petal cut-outs.
8) The centre flower feature is made using Tonic Studios Petal Pairs Petites punches (shown: PP Petites 4 - item 895e). Punch out three flowers, two of like colour, one contrasting. The flower is assembled using the Petal Pairs Centre Perks technique (see my earlier blog post: http://thepapercraftpost.blogspot.co.uk/2012/02/best-buddies.html, Best Buddies, 27Feb 2012). When you assemble the flower, make sure that the contrast-coloured flower is face down.

9) Folding the Centre Perk: fold the contrasting-coloured petals so they meet at the flower centre. Fold the petals down consecutively,
tucking the last one under. Since you fold the petals under, the textured side comes out right-side-up in the finished Centre Perk flower.

10) Stick the Petal Pairs flower onto the ribbon reel top. I used 3D
Foam Squares from Scrapbook Adhesives by 3L.

11) The ribbon reel structure is now complete - time to load on the ribbon. Stick a piece of double-sided tape onto the end of the ribbon, fix it onto the reel barrel, and wind the ribbon on, keeping a constant tension. (I used Crafty Power Tape from Scrapbook Adhesives by 3L, which is super-sticky for repeated ribbon fastenings.) Ribbon, of course, comes in different widths - so on the pattern template, below, you are given a choice of reel barrel widths.


The leaf-shaped ribbon tab secures the ribbon tail to the reel. Score a V-shaped vein at the leaf centres, clip the leaves to the centre of the V and fold them upwards. Apply double-sided tape to the wrong side of the "stem" of the ribbon tab (Crafty Power Tape from Scrapbook Adhesives by 3L again.) 
12) When you apply the tab to the ribbon, fold the stem at an angle so that the leaves are visible beyond the flower. Fix it onto the ribbon like so:

The ribbon reel is now complete! Make one, or make a baker's dozen.

 
Pic above shows the ribbon reels with various centre flowers achieved with Petal Pairs Petites punches. Left to right: Petal Pairs Petites 2 (893e), PP Petites 4 (895e), and PP Petites 1 (895e).


Pressed for time? Above is a no-frills version of the ribbon reel flower.
The flower petal cut-outs have been eliminated - and a larger, standard-sized Petal Pairs punch has been used to make the outer petals of the centre flower.
Above, the no-frills ribbon reel with punches. Left to right: Punch from Petal Pairs Box Set 3 (882e) for the outer petals, and PP Petites 4 (895e) for the Centre Perk.

Time to make the basket now. Very simple to do:


1) Cut out the basket base and score the folds using an embossing tool held against a metal ruler. Punch the holes for the ribbon ties. Use a 1/8in circle hand punch. Position the holes about 2.5cm (1in) up from the base and 1cm (3/8in) in from the sides. Mark the widthwise centre of each basket side on the inside of the basket in pencil. A Tonic Studios Simplicity Geared Pattern Punch (style 948e Dotty Border) is used to create the lacy basket border.
 2) Place the first punch at the centre of each side. Work outwards to the edges, right and left, to complete the border. The geared punch cuts like butter - no elbow grease required.

Pic above shows a completed punched side. Remove the waste paper above the scallops and repeat for the remaining three sides of the basket base.


3) Punch a handle strip (Tonic Studios Simplicity Geared Pattern Punch,
Daisy Strip, item 940e). Just work your way along the edge of the paper until desired length is achieved. About 25-28cm (10-1/2 - 11in) is about right. (Tip: save the evacuated flower centres from the punched border. You can use them for as embellies for a future project.)
 4) Glue one end of the handle inside the basket at the centre on a long side.


5) Punch (or pierce) holes to either side of the handle, just below the punched border.

6) Use a tapestry needle to thread a 30cm (12in) piece of ribbon through the handle holes. Tie a bow; trim the ends; repeat for other side:
7) Tie a bow in each of the basket corners; 30cm (1in) of ribbon as before. For a secure bow that lies flat, bring a ribbon end through to the inside of the basket and back to the front, encircling the corner ribbon, then tie the bow on the front. Like so:
Here's a view from inside the basket:


You can see how the ribbon is encircled at the corner, keeping it close to the basket sides. Neat. Repeat for remaining three basket sides and your basket is complete.

If you prefer a tray-style basket, just omit the handle.

You'll be wanting these:


So, there you go - Petal Pairs Ribbon Reels and presentation basket. If you a in a hurry, a single ribbon reel in a cello bag makes a nifty small gift.

By the way, today is World Cardmaking Day:
: ) See what I did there. The ribbon reels and leaf tabs have been re-purposed. You can also use them as giftwrap embellishments.

That's a wrap for today's tut.

Big thanks to Leah, my patient photographer and adviser.