


Each envelope has a pleated accordion inset – expandable space for stashing stuff. (To do
a quick study on how to fold them, check out my previous blogpost – and Paul
Jackson’s new book, Complete Pleats.)
The envies are also fun as solo hanging envelopes – the choice
is yours.

Here are your free design files – it looks like a lot of
stuff, but the envelope construction is fun and do-able. There are files for
the accordion panel, for the envelope (in three colours), and for the washi
shapes.
AccordionPanel.studio3
GreenWashiEnvelope.studio3
YellowWashiEnvelope.studio3
RedWashiEnvelope.studio3
WashiShapes.studio3
AccordionPanel.pdf
GreenWashiEnvelope.pdf
YellowWashiEnvelope.pdf
RedWashiEnvelope.pdf
WashiShapes.pdf
AccordionPanel.studio3
GreenWashiEnvelope.studio3
YellowWashiEnvelope.studio3
RedWashiEnvelope.studio3
WashiShapes.studio3
AccordionPanel.pdf
GreenWashiEnvelope.pdf
YellowWashiEnvelope.pdf
RedWashiEnvelope.pdf
WashiShapes.pdf


Washi Accordion
Envelopes
You will need:
A 4 Photocopier card, cream
Coloured copy paper (Paperchase Spectrascope pad, A4)
Joy Craft adhesive Hook and Loop dots
3mm-wide ribbon
Tacky PVA glue, cocktail sticks
Fine-point embossing tool, metal ruler
1 Cut out all the envelope components. For each envelope,
you need the envelope Front Flap/Back piece and the Envelope Front piece, plus
two reinforcements cut out from cream-coloured photocopier card (print-and-cut
with a Silhouette machine); one accordion panel cut from coloured copy paper
(print-and-cut with a Silhouette machine); and adhesive washi cut-outs cut out
from Silhouette Washi Sheets (cut out with blade on no.1 setting). (Three
colours of envelope are provided.)
(Note: if you are lucky enough to have a Silhouette Curio
and the large base, then you can emboss the fold lines of the accordion
panel using the fine embossing tool.)

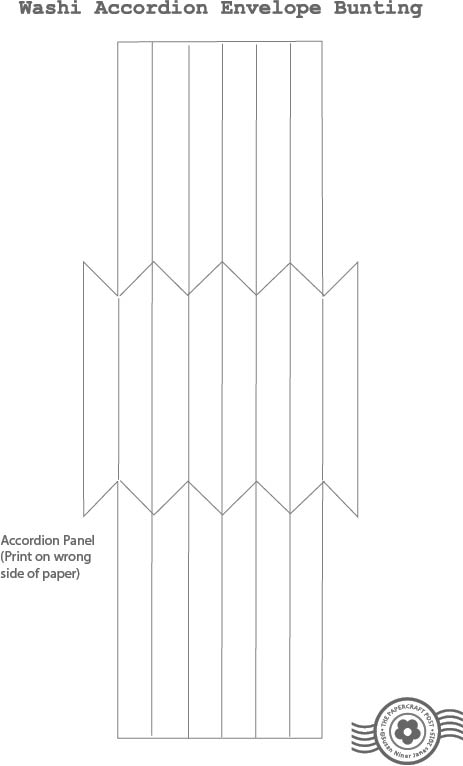
2 Using a fine-point embossing tool and a metal ruler, score the fold lines on the accordion
panel. Crease the folds – fold the
horizontal folds both ways and prime the zigzags so they will fold easily.
Next, fold the accordion panel into a U-shape, following the fold lines. Fold from the right side of the paper (the unprinted side) - it is pre-creased, so you can clearly seee the folds. The
direction of the fold reverses at each “V”. Refer to my previous blogpost about
pleating for more specific pleatings how-tos. (To learn all about pleating,
consult Paul Jackson’s new book, Complete Pleats.) Glue down the little tabs at
the bottom corners of the accordion panel, front and back (use tacky PVA glue).
3 Glue reinforcements on to the holes on the envelope back.
Use tacky PVA glue.
4 Time to add the washi appliqués. Peel off the washi shapes
from the adhesive backing and stick them onto the corresponding shapes on the
printed design on the envelope front flap. Fun!
5 Glue the envelope front onto accordion panel, edges
aligned (use tacky PVA applied sparingly with a cocktail stick). Next glue the
envelope back/front flap onto the free side of the accordion panel, edges
aligned. Crease the flap on the front fold.
6 For the closure, stick on self-adhesive hook and loop dots (loopy
side on the envelope front, fuzzy side on the envelope flap). To adhere, fasten
the dots together, stick in place on the envelope front, then lower the flap in
place and smooth down. Prise apart to open.
7 Thread ribbon through the holes in the envelope back. You
can choose to make either a bunting or a solo hanging envelope.
Note: the .pdfs are for those of you who don't yet have a digital cutter. You can colour in the patchwork shapes with felt-tips or coloured pencils, or you can cut appliqué shapes from coloured paper and glue them on.

No comments:
Post a Comment