Showing posts with label papercraft craft storage. Show all posts

Monday, 6 April 2015

Hex Hatch Patchwork Box


More papercraft sewing accessories! A fabric patchwork sewing stash box inspired me to make this printable project. I am always keen on hexagons, plus I was fascinated by the offbeat hatch-in-the-lid opening. Of course, you can use these boxes to store any small bits and pieces – stationery items, craft items. The boxes are fun to make and very giftable.

The box is an unusual shape - consequently, constructing it is a papercraft adventure of a very do-able nature. To make it, the hexagons are joined in a railway track-style strip, joined to make a ring, then the top sections are folded down. Lid and base are then added. More specific how-tos follow in the post.

Here are your free printables (instructions follow). Choice of three colourways!:


Hex Hatch Patch Box

1 Cut out the pieces. Score the folds. Crease the folds.
2 Join little tab to make a continuous strip of six hexagons. Join little tab to make a ring.
3 Join adjacent sides.
4 On the top of the box, fold under and stick down the tabs around the top opening.
5 On the bottom of the box, glue the base hexagon in place. Glue the base liner inside the
box, over the base, for a tidy appearance.
6 Insert a brad centre front of lid piece. Fold under five of the six lid tabs, leaving the tab opposite the brad unfolded. Glue the lid liner underneath the lid top.
7 Glue the lid tab under a hatch opening edge on the box top. Insert a brad on the box top, to correspond with the lid brad. Tie a piece of craft thread onto the lid brad. Wrap the thread around the brads to close the box. 

Enjoy your Hex Hatch Patch Box! Make a batch and stack your stash!

Saturday, 5 April 2014

"Mini Muffin Tin" Tutorial

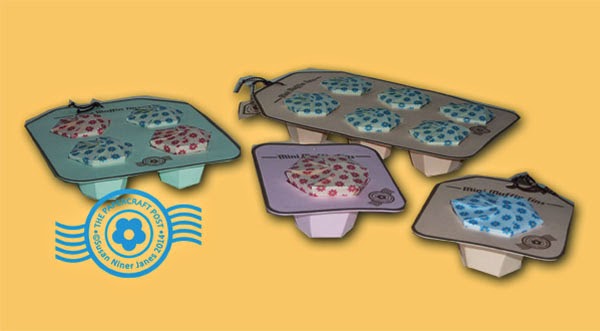
Choose from solo-, quad- or hex-compartment trays.
The tray above has lined compartments, rather than removable "muffins".
Today's project channels the home-baking trend. Since this is a papercraft project, these aren't real muffin tins - but they can be put to good use, nevertheless. Use the "muffin tins" as desktop organizers or as party favours for a baking-themed party (a yummy treat in each compartment!). Choose from one, four, or six compartments. I guess I could have called them "Cute Compartments" or "Pretty Party Organizers" - but Mini Muffin Tins it is.
As you can see above, the "muffin" container can be removed from its compartment. You can line the compartment for a "deluxe" version.

Here are your printables for all the variations:
MiniMuffinTinSixA 
MiniMuffinTinSixB.pdf
MiniMuffinTinQuadA.pdf
HexMuffinTinQuadB.pdf 
EggTray.pdf 
EggTrayCups&Liners.pdf 
MuffinCasesQuadSix.pdf 

MiniMuffinTinSoloA.pdf
MiniMuffinTinSoloB.pdf 
MiniMuffinSoloLinersA.pdf 
MiniMuffinTinSoloLinersB.pdf 

The Mini Muffin Tin solo is a larger size, so it requires a larger "muffin".
The smaller "muffins" fit the 4- and 6-compartment trays. For each size, you can choose from a rectangular or angled tray top. The Egg Tray has a plainer top end than the Muffin Tins (make it now and fill it with choc eggs).


Mini Muffin Tin Tutorial
1 For the purpose of the tut, a Mini Muffin Tin Solo will be made. The construction for the other styles is similar - only more compartments to be made. Above, parts cut out and prepped. I make the Mini Muffin Tins out of 160gsm copier cardstock.
2 Glue adjacent flaps to form a cup, like so:
Lining the cup with patterned paper is optional - but if you are going to do it, the time is now:

(Make sure the print faces inwards.)
3 Apply glue onto the cup tabs. Lower the top onto the tabs, aligning cup with the window opening: 
4 Next, apply the base cover, gluing around the edges and the hexagonal window. Smooth it in place. This is an optional step - the Mini Muffin Tin looks neater with the tabs concealed.


5 Next, make the Muffin from pretty print paper. Glue adjacent sides.
The muffin fits neatly in the tray compartment. To close the muffin top, fold down the sides consecutively in a clockwise direction, tucking the inner corner under where nececessary. (The outer corner is rounded, the inner corner is squared.)
Now you are done:
Add a tag, if desired.
A Mini Muffin Tin would make a gread brad, bead, or button stash - and/or suitable gift packaging for gifting to a crafty friend.