Thursday, 15 November 2012

Doily Gift Boxes

Ribbons and paper lace. Pretty packaging for small gifts.
These sweet mini gift boxes are tailor-made to fit the Tonic Studios range of doily dies. I've used the Daisy Square Die 225E and the Daisy
Circle Die 221E, but all the designs in the range will fit the gift box template. The box measures about 4cm high x 7cm wide (1-1/2in x
2-3/4in), big enough for sweet treats or jewellery.

The box itself can be cut from a single piece of A4 paper. (The smaller size box - 20 per cent smaller - fits two to a page.) Cut the doily out from white pearlescent paper using a die-cutting system. (I used a Cuttlebug with the following set up: A plate, C plate, shims - 2 pieces of 160gsm cardstock - die, pearlescent paper, B plate.) You can cut 4 Tonic square doilies from an A4 piece of paper.

Here is your pattern template:

Once you have everything cut out, glue the doily, centred, onto the box paper. Use a glue stick. Immediately after applying the doily to the box, smooth it in place. Put a guard sheet of clean scrap paper over the doily and smooth it with your hand. The square doily can be applied straight-on or diagonally, as preferred. You engineer how you want the design to fall. (I personally prefer pretty handkerchief points.) The circle doily is, of course, simply centred.
Above: the exterior of the box - doily glued and folds pre-creased.
Inscribe the box folds with an embossing tool held against a metal ruler. Tip: to mark the base of the box, "candle" the box cutout. Align the cutout box (with doily applied) to the photocopied pattern template. Hold it up to the light. You can then see the position of the base square, which you can then inscribe. Once the base square is marked, it is easy to position all the other folds.
Carefully crease the folds. Punch or pierce the ribbon holes. Loosely assemble the top flaps, folding them consecutively and tucking the last one under (see pic above). For each corner bow, you need 25cm (10in) of 6mm (1/4in-wide) ribbon.
Thread the ribbon through adjacent corner holes with a tapestry needle.
Knot the ribbon, then tie a bow and trim the ends. Repeat for the three remaining sides.The doily gift box is now complete.


If you prefer a more streamlined look, here's another gift box pattern template:
For this style, the side flaps are glued inside the box and the top flaps interlock in a swirl closure:
For really classy gift presentation, line the inside of the gift box with another doily!

Mega-thanks to Leah, my daughter and photographer, for doing the photo session despite having a yucky cold. (I'm sure she would have preferred to have been curled up with a good book and a cuppa.)

Monday, 12 November 2012

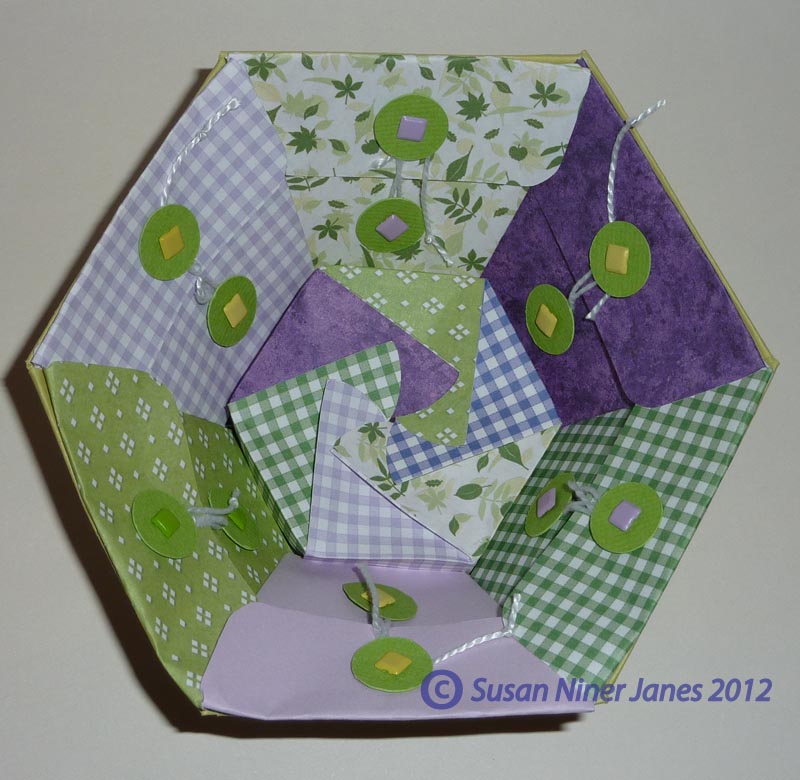
Envelo-Basket

Pockets on the outside...
...and a patchwork pin box inside!
The pin box fits neatly in the basket base...
... and can be removed for easy access.


Today's project is part of my Papercraft Fabrications strand - papercrafted sewing accessories. This bowl-style hexagonal sewing basket has plenty of storage for small haberdashery items - buttons, snaps, etc.- in the outside pockets. In the base of the basket is a swirl-close pin box. Choose different-coloured ditsy prints for the pockets and the pin box sides to create a patchwork look. Fun to craft - and it makes a great gift to give.

Here are your pattern templates:
The pattern templates given are for A4 paper - but if you can big them up by 20 per cent, that makes a nice-sized basket which fits onto 12 x 12 cardstock. I recommend Bazzill Basics for the basket and lighter-weight printed paper for the envelopes (the small prints are from Craft Creations). 

Basket: score all the fold lines with an embossing tool held against a metal ruler. Glue the little base tabs inside and the side flaps outside. Glue the top flaps onto the outside (this creates a classy rolled-style edge).

Envelopes: cut 6 in different-coloured prints. Emboss all the folds - but not the top flap, which should be folded as a soft fold. Insert the brads (with brad mats) before you fold the envelope. The accordion folds at the side fit inside the body of the envelope - but the side flaps should be glued to the outside of each envelope. Tie a craft-thread string onto the top brad for the wrap closure.

Attach an envelope onto each outside face of the basket. You can use either tacky glue or double-sided tape. 

You may prefer to attach the envelopes inside the basket, in which case you should reduce the envelope pattern by about 2 per cent:
 (If you are mad about patchwork storage pockets, you could attach pockets both inside and outside the basket...)

To make the pin box, cut out six pattern pieces from different prints, and also the piece for the base (a hexagon with flaps). Score the folds. 
Glue the box body pieces side-to-side. Crease all the folds. Glue the main pin box unit into a ring, then glue on the base. Smooth the base tabs in place from the inside of the pin box.

Here's how to fold the pin box (the "magic" is in the diagonal folds). Just swirl the flaps consecutively to shut the box top:
The pin box is fun to make up on its own - makes nice packaging for small jewellery gifts.

Have fun making your paper patchwork sewing baskets...

Friday, 2 November 2012

Snowflake Ribbon/Twine Winders

A cute stocking-filler: ribbon-wrapped snowflake.
You can add a folded centre snowflake.
Here, snowflakes are wrapped with 6mm (1/4in) ribbon.
The wrap is Baker's Twine here.

Make a bunch.
Omit the centre hole and use as a gift tag.
Grey skies and chilly weather - I'm thinking snow. As in zillions of beautiful snowflakes - no two alike : ) Here are some fun-to-make papercut snowflakes, ideal as stocking fillers. The idea is to use the snowflakes as gift packaging for small quanities of ribbon or twine. Just wrap the ribbon (or twine) around the snowflake arms, spirella-style. The ribbon winders can be used as seasonal decorations.

Here's the pattern template:
To make things as easy as poss, set your photcopier to draft quality and print the pattern template onto the back of a sheet of A4 cardstock. Use a craft knife over a cutting mat to cut out the flakes.
Pierce the centre holes with a tapestry needle (kneaded rubber eraser underneath to receive the tip.)

Wrapping: tape the ribbon end to the back of the snowflake. Bring the ribbon up and over two snowflake arms. Wrap the ribbon around these two arms three times - then advance two snowflake arms and repeat the winding. Continue winding until you have completed the round. Insert a brad in the centre of the snowflake. You can wrap the ribbon tail around the brad on the back of the snowflake - or secure it with a sticky pad. Twine is worked in a similar way, only you make adjacent (rather than overlapping) wraps. It takes about five twine wraps to load a snowflake arm. 

Add a pearl cotton or craft thread hanging loop at the top of the snowflake. (For some snowflake styles, you may need to pierce a thread hole for this.)

These snowflakes are designed to hold 6mm (1/4in ribbon). You can, of course, enlarge the design to accommodate wider ribbon. It is the angled bit at the base of the snowflake that should measure the desired ribbon width (plus a smidge of ease).

To use the snowflakes as gift tags, omit the centre holes.

An optional folded snowflake is included as a decoration for the snowflake centres. To make it, fold and then unfold the arms of the snowflake. Fold the arms consecutively, tucking them under as required.

If you'd like to try your hand at some fancy folded snowflakes and stars, check out my papercraft template for Hot Off The Press: Snowflakes & Stars 7339. Here's the link: http://www.paperwishes.com/scripts/relevance_search.php?query=Snowflakes+%26+Stars&project_search=0&x=0&y=0

Enjoy your wrap session.