 | |
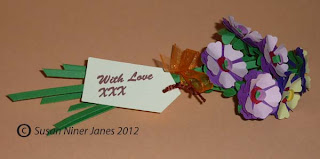
| A basketful of stemmed Petal Pairs: 100% papercrafted! |
 |
| Craft a batch - or just a bunch - of long-stemmed Petal Pairs. |
I took out my floristry craft kit - you know - stretchy green tape, wires,
wire-cutters. Lots of hardware! And I had a mini-epiphany: papercrafters love to papercraft. So... I put the wires and wire-cutters away and worked out an easy (and fun) method to make Petal Pairs flowers entirely of paper. The flowers are light, the stems are flexible. You can use them on cards or as giftwrap adornments.
Here's how-to - yes - lots of steps, but really very simple:
1) Cut narrow strips of green paper with a paper trimmer - about 5mm(1/4in) wide. Each strip is the length of an A4 piece of paper. (I used Inspire Me Premium paper.) Fold each strip of paper in half. At the midpoint, glue on a strip of 3mm (1/8in) quilling paper.
2) Wrap the quilling strip around the green strip 12 times. Trim away the extra quilling strip and glue the end down with tacky glue.
3) Apply tacky glue along the inside of one half of the green stem strip.
Fold the stem in half, aligning edges. You now have a stem with a paper bead "stop" at the top.
4) These are the Tonic Studios Petal Pairs you need for this project -
the punch on the left is from Petal Pairs Box Set 3 (882e), the middle punch is from Petal Pairs Box Set 4 (883e), and the punch on the right is from Petal Pairs Box Set 5 (884e). (Box Sets 4 and 5 are brand new!) The photo shows you the quantity and colour of shapes to punch out. (I used Inspire Me Premium paper.)
5) To make each flower: pink and purple shapes are treated as one and interlocked with a purple flower shape in the usual way to make a Petal Pair.
6) A red circle is glued onto the centre of the flower to make it pop. You can cut the red circle from a punched Petal Pairs shape - cut off the petals to obtain the circle. (Alternatively, you can cut out an 8mm circle using a digital cutting machine or you can buy self-adhesive signal dots from a stationery store.)
7) Take an embossing stylus and score centre lines on each petal of the green Petal Pair with heart-shaped petals.
8) Glue the scored green Petal Pair shape onto the back of the interlocked Petal Pair flower. The Petal Pair shape now has 4 layers.
11) Slide the flower up the stem until it reaches the top.
12) The flower now looks like this. Almost finished - you just need to dimension it and add the leaves.
14) Pinch the green leaves and pull them downwards.
15) All you need is leaves.
16) ... but first trim the stem to the desired length. (Looks smart cut on the diagonal.)
This flower-making method can be used for all the Petal Pair shapes.
We're not done yet. Thought I'd give you a bonus: a basket for your flowers. Here's the pattern template:
To make the basket:
1) Cut out the basket base, handle, and two squares. Punch holes as shown with circle handpunch. Score the fold lines with an embossing tool held against a metal ruler. Crease the folds. Glue the square inside the basket base - their purpose is to weight the basket so it doesn't tip over when filled with flowers. You need robust cardstock for the basket.
I used Bazzill Basic.
2) Tie a ribbon bow to join adjacent basket sides. Use a tapestry needle to thread the ribbon. For each bow, you need 25cm (10in) of ribbon. For the basket waist bow, you need 35cm(14in) of ribbon.
you'll be surprised how quickly it goes. Do it production line-style.)


HI
ReplyDeleteSO GLAD I FOUND YOUR SITE. I BOUGHT A NUMBER OF YOUR TEMPLATES AND WATCH FOR NEW ONES ON PAPERWISHES.
lOVE THE 3D PROJECTS OF WHICH I WANT TO DO MORE .
THINK WILL DO THE BASKET OF FLOWERS FOR MY DESK AND THAT WAY WILL REMIND ME TO LOOK AT YOUR SITE WHICH IS BRILL
THANK YOU AND KEEP THE GOOD WORK UP.
NADINE XXX
Hi Nadine,
DeleteThanks so much for your kind word - greatly appreciated! Yes, 3-D is my thing and I have more blog posts planned - so please do check in from time to time.
The card you posted on Twitter was fab!
Best,
Susan :)