 |
| New-look links for gum wrapper chains. Cut-outs create peek-a-boo colour effects. |
(compared to links fashioned from real gum wrappers) - you no longer have to fold the lengthwise edges inward - but the link shapes are fancier. Cut-out and cut-away designs create fascinating colour effects. The links are assembled in the familiar way.
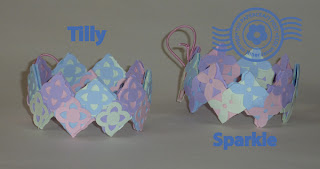
These gum wrapper links have been made into bracelets: a fun half-term project. A tie of cord elastic fastens the bracelet and adds a bit of "give".
Here are your freebie file downloads:
GumWrapperChains.svg
GumWrapperChainsSelect.pdf
It is recommended to digi-cut this project. If cutting out by hand, go for the simplest link designs.
Here's a Gum Wrapper Chain Refresher Course:
2. Insert the link between the loops and slide it towards the folded end of the receiving link.
3. The blue link in place.
4. Insert the next link from the bottom upwards. Continue steps 3 and 4 to make the chain.
5. A repeating colour sequence can be very effective.
Of course, the simple shapes are easiest to interlock. Take your time when linking ornate styles.
You can big up the links to make party paper chains. Or, you can weave four links together to make a medallion. Punch a hole in the top of the medallion and add a hanging loop.
Thanks for taking the pics, Leah!


These are great, thanks for sharing:)
ReplyDelete