Yesterday's paper patchwork baskets were a cinch - so I'm ramping things up just a little bit today. These rounded square basket shapes are very pleasing. They are not difficult to make - just make sure that you accurately position the sides when you glue them onto the basket base. It takes eight paper patchwork squares to make up the basket circumference.
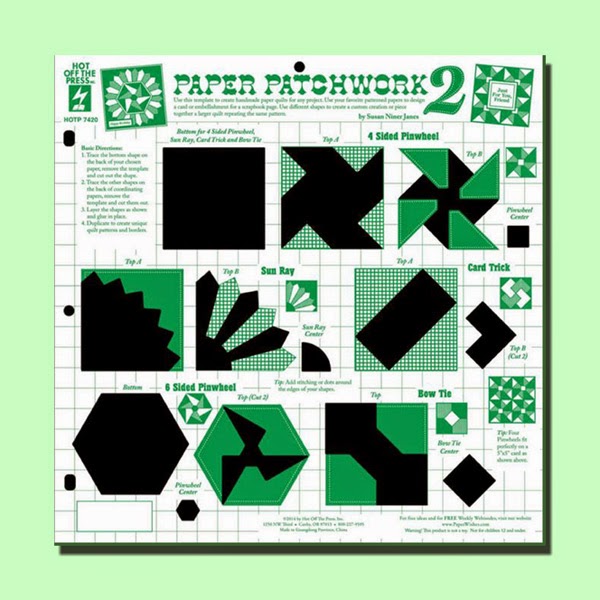
The squares on these baskets are from my HOTP Paper Patchwork 2 template:
If you don't yet have the template, then any 2-1/2in paper patchwork block will fit (I gave you three in Monday's post).
Here are your basket files:
SquareBasketRoundedBaseF/B1of2.pdf
SquareBasketRoundedSidesHandle2of2.pdf
SquareBasketRoundedBaseFB1of2.svg
SquareBasketRoundedSidesHandle2of2.svg
The first template has the basket base and sides. You need to cut two side panels. The lines on the pattern pieces show how to position the paper patchwork blocks.
The second template has the side panels (which have holes for the basket brads) and the handle. The handle is cut in two pieces because it won't fit onto a page of copier paper.
Here's how to make the basket:
Rounded-Square Basket
1 Cut out two basket front/back pieces, two basket side pieces, two handle pieces, and one basket base from cardstock. Score the folds and crease them.
2 Make eight paper patchwork blocks in the designs of your choice. Glue them onto the basket front/back and side pieces.
3 Referring to the placement markings on the pattern template, glue the bottom tabs of the basket front/back and side pieces onto the basket base, like so:
Tip: before you attach the front/back panels, "prime" them so that they curve gently - simply shape them over the side of your hand.
4 Fold the basket sides up, then join the adjacent sides, making sure that the short tabs are inside the basket. Next, stick the short tabs down in the corners. Use a strong PVA glue - like tacky glue to secure the joins firmly. You can cut another basket base piece to conceal the construction flaps if you like to keep things tidy.
5 Handle: overlap the join by 2in (5cm) and glue. Camouflage the join with a decorative piece of paper. Carefully pierce brad holes through the patchwork blocks on the two side panels. Attach the handle with brads on the inside of the basket.
All finished now:
The baskets would make great gift presentation packaging for balls of yarn - or patchwork fabrics.
Remember - paper patchwork containers all this week on the blog. Moving on to big boxes next. Stay tuned.
Showing posts with label paper patchwork baskets. Show all posts
Wednesday, 21 May 2014
Tuesday, 20 May 2014
Paper Patchwork Baskets
(Or, you can use the freebie bonus shapes that I've given you - hexagon block below, other shapes in yesterday's post. I didn't think that it was fair to give you my containers without being able to complete them properly if you didn't have the plastic template. Having said that, the HOTP Paper Patchwork templates feature some all-time classic patchwork blocks!)
Here are your freebies:
HankiePointBasket.pdf
HankiePointBasket.svg
Hexagon-ToppedBasket.pdf
Hexagon-ToppedBasket.svg
HexagonBlock.pdf
HexagonBlock.svg
![]() | |||
Same handle for both basket shapes! |
![]() |
Your freebie hexagon block. |
Paper Patchwork Baskets
Both baskets are made in the same way. They differ only in the shape at the top of each side.
To make up:
1. Make the layered patchwork blocks.
2. Cut out the basket pieces. For each basket you need two body/base pieces and a handle. Score and crease the folds.
3. Glue a patchwork block onto the top of each basket side. Turn one basket body/base piece 90 degrees. Place it on top of the other body/base piece and glue the bases together. Next, glue the adjacent basket sides.
4. Carefully pierce a handle hole on opposite sides of the basket. Attach the handle with brads, handle ends placed inside the basket.
All done. Enjoy your paper patchwork baskets. They are ideal for gift-giving if lined with a square of tissue paper. Lined with a paper napkin, they make fun containers for party snacks, like totilla chips.
By the way, if you enjoy historical novels, The Last Runaway, by Tracy Chevalier features patchwork quiliting aplenty. Tracy Chevalier always writes so well about women and their handiwork, whether their craft is a hobby or a vocation.
Subscribe to:
Posts (Atom)