More Ski Sweater-themed festive makes. (When I have an idea, I run with it : )...) Cards and envelopes today. Two types of cards, two types of envelopes. All can be swapped around. The cards are proper cards with greetings inside as well as outside. The printables fit nicely onto an A4 sheet of paper.
Choice of two types of envie: office-style or tab-close. The envelopes measure about 8 x 11cm (3-1/8 x 4-1/4) inches. So we are talking dinky cards here - cute, but not microscopic.
The standard-type card, shown above, is a fold-over design - just fold it in half, then in half again. Crease the folds with a bone folder for a nice crisp appearance.
The mitten cards have a mitten-shaped greetings insert for the inside page - simply attach it with a snippet of d/s tape at the top.
Time now to explain about the tab envelopes (above). The closure flap has a projecting tab. You have a choice of three seal designs to put on the flap. (Stick the seal on with a bit of d/s tape or a smidge of glue stick.) Tah dah! Perfectly centred seal every time. To close the envelope just add a sticky dot on the underside of the envelope tab (Dodz by Scrapbook Adhesives by 3-L).
That's your de-briefing. A mini-tut on how to fold the Office Envelope will follow. But first...
Here are your free downloads:
Fold-OverCardRed.pdf
Fold-OverCardGreen.pdf
OfficeEnvelopeRed.pdf
OfficeEnvelopeGreen.pdf
SkiSweaterTabEnvieRed.pdf
SkiSweaterTabEnvieGreen.pdf
MittenCardsLiners.pdf
Fold-OverCardRed.svg
Fold-OverCardGreen.svg
OfficeEnvelopeGreen.svg
OfficeEnvelopeRed.svg
SkiSweaterTabEnvieGreen.svg
SkiSweaterTabEnvieRed.svg
MittenCardsLiners.svg
Office Envelope Mini-Tut
1. Above, the office envelope with folds creased. Note that the top flap is creased above the diagonal corners. While the envelope is unfolded, insert the brads through the brad mats. You need about 25cm (10in) of craft thread for the tie. Attach the tie with a loop - a slipknot around the brad, under the brad mat.
2. Fold up the bottom flap. Apply d/s tape to the right side of the bottom flap, then fold over the longer envelope side as shown.
3. Apply d/s tape to the bottom edge and the long edge of the remaining envelope side. Next, carefully fold the envelope side to the centre of the envelope, sliding it under the brad mat. Smooth down the edges with a bone folder. All done!
Pic above shows both sides of the envelope. The name has been added by computer - but you might want to try a bit of calligraphy for a handmade touch. (Note: to type in the name in .studio, you will have to ungroup the elements of the cutting file first.)
These cute little cards would be ideal to hand out in the classroom, or as greetings for your neighbours. They are also just right if you want to add a personal note to a gift - kind of a gift tag plus.
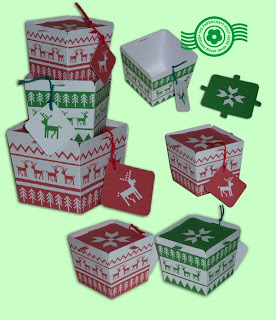
Ski Sweater gift boxes today. The slot-top lids are easy to fit in place.
There are two slightly different print designs to choose from.
... and of course, you can re-size the boxes (as long as they fit onto the printer paper). Thanks to the sides extending above the lid, the boxes are stackable, which makes for a pretty display.
Here are your free downloads:
SkiSweaterGiftBoxRed.pdf
SkiSweaterGiftBoxGreen.pdf
SkiSweaterGiftBoxGreen.svg
SkiSweaterGiftBoxRed.svg
There's nothing much to know about making the boxes up. If you are making the .pdf version, then you must cut the slots out with a craft knife held against a straight edge (use a cutting mat). For all versions, simply score the side flaps and the base folds, then join the adjacent flap to the underside of its neighbouring side.
Tip: tie the gift tag through a slot, before you put the lid on!:
For a classy, textile-like effect, use textured cardstock (like American Crafts Cardstock, which is printer and digi-cutter friendly).
So that's it. Enjoy the freebie printable gift boxes!
Clocks back tonight. Shorter days. Time for a cosy project. More winter woollies: Mitten Cards. The smaller guys are gift tags/ornaments. Nothing much to tell you in the making up department. Just cut out the cards and fold them in half (score first, of course). For the tags, punch a small hole in the bottom end, thumb sideof each mitten and tie on a piece of soft embroidery cotton.
Tip: use textured card to create more of a textile effect (I used American Crafts Cardstock).
Here are your free downloads:
Mittens2013Red.pdf
Mittens2013Green.pdf
The mittens have a life beyond Christmas if you tweak the colourways a bit:
This is the 100th Papercraft Post blogpost. It has been an enjoyable journey. It has certainly been a learning curve in terms of the techie stuff. Thanks very much for visiting my blog.
I've still got some more Ski Sweater festive makes to share with you:
slot-lid gift boxes and the Christmas Card rack. More soon.
Post No. 99 today: Ski Sweater Cornets. Free downloads and a tut, too!
The finished cornet measures about 11.5 x 4cm (4-1/2 x 1-1/2in) - big enough to contain a few sweet treats or a small gift. If you punch holes near the top (at either side) and add a ribbon hanging loop, a cornet makes a great tree ornament. Or use them as party favours.
Here are your free downloads:
SkiSweaterCornetRed.pdf
SkiSweaterCornetGreen.pdf
SkiSweaterCornetGreen.svg
SkiSweaterCornetRed.svg
The .pdf files are simple print-and-cut. For the .studio files, I fit everything onto one page, so you will have to shift the tags around
when you print-and-cut. No big deal - just make sure all the elements are in the printing area.
Now for the tut:
Ski Sweater Cornet Tutorial
1. This pic shows the cornet components cut out and prepped. Score the folds using an embossing tool held against a metal straightedge. For the cornet, score the vertical folds and those at the base of the top flaps. For the top knot: score the vertical folds and a fold across the middle widthwise. Craft thread has been attached to the gift tag with a half-hitch knot.
2. Join up the cornet. Apply d/s tape or glue to the flap. Take care to match up the pattern (like when sewing a garment!).
3. Tamp down the join inside to make sure that the seal is secure. A bone folder helps you reach right down to the point.
4. Punch a hole for the gift tag in the corner of one of the top flaps. I've used a 1/8in circle handpunch to do the job.
5. Tie on the gift tag.
6. Fill the cornet with the gift or goodies. When you close the top flaps, make sure the gift tag is on the outside! Fold the flaps: start with the gift tag flap. One, two, three, four (anti-clockwise) - tuck the last flap under. Tah dah. The cornet is pretty as is. Or, you can add a decorative seal to the top (use a sticky dot, Dodz by Scrapbook Adhesives by 3L). Or, you can add an extravagant pleated fan top-knot...
7. Accordion-pleat the top-knot. Staple it at the centre. I used my Tim Holtz Tiny Attacher, my favourite stapler in the universe - it reaches to the centre easily. Now you've got a pleated bow:
8. Fold the bow
in half widthwise. Join together with d/s tape or sticky dots. Pinch the
join to make sure it is secure. You've got a fan. Open out the fan to
180 degrees. Apply sticky dots along the bottom edge (you need at least
three, one at the centre, and at opposite ends).
9. Stick on the top-knot. Apply it diagonally. Make sure that the printed side faces front! All done. Time for a party!:
Well, that was Papercraft Post No.99! More Ski Sweater makes soon: gift boxes, a Christmas card rack, mitten cards. Thanks for visiting!
It is coming up to my 100th blog post (this is no. 98)! Wow. To celebrate, I'm posting a co-ordinated batch of seasonal papercrafts. A veritable freebie extravaganza. The theme: Nordic-style Ski Sweaters (alas, no Sara Lund to watch this season). Today's make: festive buntings in graduated sizes, nano (suitable for giftwrapping & scrapbook pages); mini and large (suitable for decking the halls).
Here are your downloads:
SkiSweaterBuntingNano.pdf
SkiSweaterBuntingMaxiMini.pdf
SkiSweaterBunting.svg
SkiSweaterBuntingNano.svg
So, you're good to go. Nothing much to know about making these up.
For the .pdf version of the nanos and minis, you will need to pierce the stringing holes with a hand-held circle holepunch. (Or with a needle - take care.) Thread the nanos and minis on craft thread (a large-eyed needle may come in handy) and the maxis on 1cm(3/8in)-wide ribbon. Make sure that the ribbon doesn't twist.
Here's a back view of the maxis:
You need to stick down the bottom of the tabs with snippets or d/s tape or glue.
Of course, you can adjust the bunting sizes as you wish. And of course, tweak the print-out so you can fit as many as possible onto a single sheet of paper. I like to make them up in 120gsm paper.
So, there you go: put a flag on it!
Here's a preview of projects to come very soon:
 |
| Slot-top gift boxes. |
 |
| Gift box cornets. | |
|
There will also be a Christmas card rack. Stay tuned!
These Ivy Trellis gift bags can be used all year round - add a pretty red bow for the festive season. The ivy link garland is fun to make and is a very useful embellishment. Go ivy on greeting cards, giftwrap treatments, scrapbook pages. Enlarge the links to make Christmas tree garlands or party decs - makes a nice change from paper chains.
There are downloads for the bags and garlands, plus a mini-tut on the garlands.
Here are your files:
IvyGarland.pdf
IvyTrellisGiftBagSmall.pdf
IvyGarland.svg
GardenTrellisGiftBag1of2.svg
GardenTrellisGiftBag2of2.svg
IvyTrellisGiftBagSmall.svg
About the gift bags: The bigger-sized gift bag is pieced. The bag handle reinforcements are optional. Glue them behind the handles (with glue stick) if you think your paper choice is a little flimsy. Score the folds, then crease with a bone folder. Join the "seam" - it goes at the back. For the bag base, fold in the side flaps first, then slip the tab into the slot. You can glue the tab for a secure seal. If the bag contents are heavy, line the base with a paper rectangle a smidge smaller than the size of the slotted base.
Tie one end of the garland onto the bag handle. Secure the other end with a small Dodz sticky dot by 3-L.
Ivy Garland Mini-Tut
1. Cut out the ivy loopy links-it is best to use double-sided green paper - looks more realistic. But you can print-and-cut if you prefer. Crease each leaf in half to make a centre vein. For a nice, crisp fold: score first with an embossing tool held against a metal straightedge.
2. Link the loops. The loop end is inserted from underneath the previous loop. Very important!
3. Next, slip the inside edge of each ivy leaf on top of the previous loop. That's it! Repeat to make an ivy garland of the desired length.
 |
| Ivy Garland |
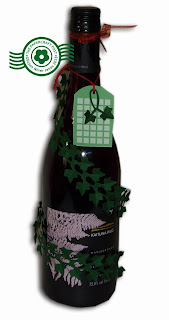
Here's a fun (and eco-conscious) gift presentation idea. Simply wrap an ivy garland, spiral-style around a wine bottle. Secure the top with a bow and the end with a glue dot. Tie the gift tag onto the throat of the bottle. No wasteful giftwrap. The recipient knows what the gift is, anyhow - there's no disguising a bottle!
 |
| A vine for the wine! |


