The challenge in yesterday's GBBO - a towering centrepiece - reminded me to run this project! As you can see, this is a three-tiered tree (say that four times fast). Each container is a treat box. The apex pyramid box is similar to my pyramid treat box - it opens petal-style and laces shut in the same way. The bottom boxes are inverted - lid at base - but don't worry, the closure is secure and the contents won't fall out. The tiers are stuck together with Glue Dots. The finishing touches are a decorative mat and a gift tag.
Here are your freebie design files:
StackingPyramidTree1of4.pdf
StackingPyramidTree2of4.pdf
StackingPyramidTree3of4.pdf
StackingPyramidTree4of4.pdf
StackingPyramidTree1of4.studio
StackingPyramidTree2of4.studio
StackingPyramidTree3of4.studio
StackingPyramidTree4of4.studio
You can either assemble the tree component boxes on-site (work colleague's desk?) or present them as a D-I-Y assembly job, presenting the stacking boxes in a gift bag along with the sticky dots and a how-to note.
I like to put a choc at the apex and baked goodies - like brownies - below.
Showing posts with label Xmas papercrafts. Show all posts
Thursday, 1 October 2015
Wednesday, 26 August 2015
Celtic Knot Bell Ornament
Thought I'd post this project as a follow-on to the Himmeli-Look Bell
tutorial, my previous blogpost. It's made in exactly the same way - so you're up to speed. All you need are the print-and-cut files, and you're good to go:
CelticKnotBell.pdf
CelticKnotBell.studio
CelticKnotBell.svg
The bell has a jingle-bell clapper. I opted for practically no-frills - but a velvet-y green ribbon would look lush as a finishing touch!
... and here's a link to an earlier project which co-ordinates with the bell:
Celtic Knot Pillow-Purse
tutorial, my previous blogpost. It's made in exactly the same way - so you're up to speed. All you need are the print-and-cut files, and you're good to go:
CelticKnotBell.pdf
CelticKnotBell.studio
CelticKnotBell.svg
The bell has a jingle-bell clapper. I opted for practically no-frills - but a velvet-y green ribbon would look lush as a finishing touch!
... and here's a link to an earlier project which co-ordinates with the bell:
Celtic Knot Pillow-Purse
Monday, 24 August 2015
Himmeli-Look Bell Tutorial
The Himmeli-look-alike binge continues. The look of Finnish strawcraft... in paper! Today I'm walking you through the Himmeli-look bells. They are much easier to make than they look. Once you cut out and crease the pieces, they almost make themselves. It looks like there's a lot going on, but each bell only has three pieces (not counting the jingle bell clapper or optional bow).
Here are your free downloads:
HimmeliBell.pdf
HimmeliBell.studio3
HimmeliBell.svg
Himmeli-Look Bell
1 See - only three pieces! Cut out the pieces. Score and crease the folds as shown.
2 To assemble the bell body, glue the adjacent tabs - tahdah - dome shape. Bend the handle with a soft fold at the top. Glue it together just above the base folds. Glue the little hexagon underneath the handle to stabilise the join.
3 Time to attach the clapper. Thread a jingle bell onto a piece of craft thread. Knot the thread to mark the height of the bell drop (about 4.5cm/1-3.4in). With jingle bell inside, tie thread tails as shown, on opposite side of bell. Knot the thread ends at centre top, and tie another knot around the first knot to secure. Trim the thread ends.
4 Next, glue the handle onto the bell top. The v-shaped tabs on the handle match those on the bell top - take care to align the edges.
5 Add a bow at the handle base. Your choice - ribbon or paper! If you want a paper bow, find one here. (Reduce the size of the bow to fit the bell.)
All done. Now you can deck the halls!
Here are your free downloads:
HimmeliBell.pdf
HimmeliBell.studio3
HimmeliBell.svg
Himmeli-Look Bell
1 See - only three pieces! Cut out the pieces. Score and crease the folds as shown.
2 To assemble the bell body, glue the adjacent tabs - tahdah - dome shape. Bend the handle with a soft fold at the top. Glue it together just above the base folds. Glue the little hexagon underneath the handle to stabilise the join.
3 Time to attach the clapper. Thread a jingle bell onto a piece of craft thread. Knot the thread to mark the height of the bell drop (about 4.5cm/1-3.4in). With jingle bell inside, tie thread tails as shown, on opposite side of bell. Knot the thread ends at centre top, and tie another knot around the first knot to secure. Trim the thread ends.
4 Next, glue the handle onto the bell top. The v-shaped tabs on the handle match those on the bell top - take care to align the edges.
5 Add a bow at the handle base. Your choice - ribbon or paper! If you want a paper bow, find one here. (Reduce the size of the bow to fit the bell.)
All done. Now you can deck the halls!
Thursday, 6 August 2015
Xmas Tree Pyramid Treat Box
These cute little pyramid boxes are just the right size for a choc truffle or a similar confectionery treat. You can print up a batch, score and fold them, and have them ready for filling when the holiday season arrives. They are ideal as stocking fillers - or just for spreading festive cheer.
Here is your free printable papercraft:
XmasTreePyramidTreatBox.pdf
XmasTreePyramidTreatBox.studio
XmasTreePyramidTreatBox.svg
To make:
Print, cut, score fold. Here's how to lace the top:
You need 25cm(10in) of ribbon. Tie it in a bow and trim the ends (obviously after you have placed the contents). Make sure the flaps lie within the box.
I had so much fun designing this project that I've crafted a stacking treat box version- a three-tiered Xmas tree. Watch this space!
Here is your free printable papercraft:
XmasTreePyramidTreatBox.pdf
XmasTreePyramidTreatBox.studio
XmasTreePyramidTreatBox.svg
To make:
Print, cut, score fold. Here's how to lace the top:
You need 25cm(10in) of ribbon. Tie it in a bow and trim the ends (obviously after you have placed the contents). Make sure the flaps lie within the box.
I had so much fun designing this project that I've crafted a stacking treat box version- a three-tiered Xmas tree. Watch this space!
Saturday, 25 July 2015
Xmas in July: Snowflake Pentagon Ball Ornament
Xmas crafting in July. Sounds counter-intuitive - but it is a thing. A very big thing. And it makes so much sense. School's out. The pace is slower. No pressure! And crafting is the ideal antidote to dismal holiday weather.
Today's project is a printable papercraft pentagon ball ornament with snowflake decorations. If you have a digital papercutting machine, then you can print-and-cut it. But it can also easily be made by hand once you've printed it out. Assembling it is lots of fun - a bit like a jigsaw puzzle.
Here is your free papercraft printable:
SnowflakePentagonBallOrnament.pdf
SnowflakePentagonBallOrnament.svg
SnowflakePentagonBallOrnament.studio
Snowflake Pentagon Ball Ornament
1 Print the template onto 160gsm white photocopier card.
2 Cut out the pattern pieces by hand or by machine. Score the fold lines using a fine-point embossing tool held against a small metal ruler.
Crease the folds.
2 The pentagon ball is made in two halves. To assemble each half, first join front to back to make a ring. Next, fold down the lid and glue it in place (PVA tacky glue applied with a cocktail stick does the job).
3 Glue top to bottom along the zig-zag edge, matching the points and gluing the tabs. Note: if you wish to pop a jingle-bell inside to raise the fun factor, do so before securing all the tabs.Try to avoid having segments of like colours touch - but this won't be entirely avoidable.
4 Next, make the hat-like ornament top. (The printed fold lines belong on the wrong side.) Score and crease the folds. Join tab of long strip to front of long strip, to make a ring. Fold down the lid, gluing the tabs inside. Fold the curved tabs outwards, making petal-like projections.
You can knot and insert a hanging loop through the hole on top or, alternatively, you can add the hanging loop arc (the extra bit), for a more elegant finish. Two mirror-image pieces are required. Glue the arcs together and fold the pentagon-halves outwards. Glue onto ornament top, matching edges. Tie on a hanging loop. (Craft thread or baker's twine recommended.)
Whichever style you selected, you must now glue the ornament top (the "hat") onto the top of the pentagon ball. A printed pentagon indicates placement - glue the "petals" down.
Your ornament is now complete.
You can, of course, enlarge or reduce the template on a photocopier.
(Always nice to have varying sizes in an arrangement.)
Today's project is a printable papercraft pentagon ball ornament with snowflake decorations. If you have a digital papercutting machine, then you can print-and-cut it. But it can also easily be made by hand once you've printed it out. Assembling it is lots of fun - a bit like a jigsaw puzzle.
Here is your free papercraft printable:
SnowflakePentagonBallOrnament.pdf
SnowflakePentagonBallOrnament.svg
SnowflakePentagonBallOrnament.studio
Snowflake Pentagon Ball Ornament
1 Print the template onto 160gsm white photocopier card.
2 Cut out the pattern pieces by hand or by machine. Score the fold lines using a fine-point embossing tool held against a small metal ruler.
Crease the folds.
2 The pentagon ball is made in two halves. To assemble each half, first join front to back to make a ring. Next, fold down the lid and glue it in place (PVA tacky glue applied with a cocktail stick does the job).
3 Glue top to bottom along the zig-zag edge, matching the points and gluing the tabs. Note: if you wish to pop a jingle-bell inside to raise the fun factor, do so before securing all the tabs.Try to avoid having segments of like colours touch - but this won't be entirely avoidable.
4 Next, make the hat-like ornament top. (The printed fold lines belong on the wrong side.) Score and crease the folds. Join tab of long strip to front of long strip, to make a ring. Fold down the lid, gluing the tabs inside. Fold the curved tabs outwards, making petal-like projections.
You can knot and insert a hanging loop through the hole on top or, alternatively, you can add the hanging loop arc (the extra bit), for a more elegant finish. Two mirror-image pieces are required. Glue the arcs together and fold the pentagon-halves outwards. Glue onto ornament top, matching edges. Tie on a hanging loop. (Craft thread or baker's twine recommended.)
Whichever style you selected, you must now glue the ornament top (the "hat") onto the top of the pentagon ball. A printed pentagon indicates placement - glue the "petals" down.
Your ornament is now complete.
You can, of course, enlarge or reduce the template on a photocopier.
(Always nice to have varying sizes in an arrangement.)
Monday, 20 July 2015
Fröbel Star Connections
A solo Fröbel Star is a thing of beauty in its own right –
but being crafty and curious, it may not have escaped your notice that the star
points of each Fröbel are pockets. Tah dah – these can be used as connectors.
Each Fröbel is a modular unit which can be used to construct larger shapes. Point to pocket - perfect fit!
The star points can be connected in two different ways –
seamless link or gappy. See the pic, above. With this knowledge, you can experiment and
construct all sorts of ornaments (below).
Here’s a pic of a Fröbel wreath (not my original idea – it’s
a thing – Google it). There are also methods of folding down one point and
interlocking the shapes – but I’m not doing advanced Fröbel construction in
this post.
You can also insert a Fröbel weaving strip through the
weaving slots to make a hanging loop. (The strip ends will come out on opposite
sides of the star.) Trim the strip ends below the slots. Add a dab of glue
inside the slots to secure.
Now – if you want your Fröbel ornaments to stay together, it
is probably a good idea to put a dab of PVA glue inside the pockets using a
cocktail stick applicator.
Tempted? Check out my Fröbel Star Tut & Tips posted earlier. Enjoy!
Saturday, 1 November 2014
Snowflower Cards & Stands
It would be fun to send a card along with a pre-cut flat-pack stand. The stand is super-simple to make: cut out (of course), crease the folds.To assemble, stick the sloted band onto the base at either side (shape the band so it curves easily into an arch). Next, stick the side panel top tabs onto the band (at 12 o'clock) - on both front and back.
There are two versions of the stand. The one with the extended base can support slightly heavier cards. (You don't have to use the card stand exclusively with the co-ordinating Snowflower Card.)
Here are your freebies:
SnowflowerCard.pdf
SnowflowerCardLiner.pdf
SnowflowerCardHolders.pdf
SnowflowerCard.svg
SnowflowerCardLiner.svg
SnowflowerCardHolders.svg
Sunday, 26 October 2014
Gingerbread House Card Rack
I've been making my toast rack-style card racks for three seasons now - so I thought I'd ramp things up a little and try something different to the ususal domed shape (Toast Rack Card Racks 2014). I've tweaked the design of the rack to resemble a gingerbread house.
The Gingerbread House Card Rack is made in pretty much the same way as my original design - make the slotted body first, then pop in the ends. The difference for this style being that you must crease some additional folds to create the house shape. Tip: score the fold lines in the toast rack body before cutting out the slots. And... when you do fold the rack, place a metal ruler along the scored line as you fold all the slots simultaneously.
The eaves of the roof of the Gingerbread house project beyond the toast rack. There are two versions of the toast rack ends: basic gingerbread house and gingerbread house with its owner/occupier on the doorstep.
Here are your freebies:
GingerbreadHouseCardRackEnds.pdf
GingerbreadHouseCardRackBody
GingerbreadHouseCardRackEnds.svg
GingerbreadHouseCardRackBody.svg
For co-ordinating cards to go with the card rack, go here.
The Gingerbread House Card Rack is made in pretty much the same way as my original design - make the slotted body first, then pop in the ends. The difference for this style being that you must crease some additional folds to create the house shape. Tip: score the fold lines in the toast rack body before cutting out the slots. And... when you do fold the rack, place a metal ruler along the scored line as you fold all the slots simultaneously.
The eaves of the roof of the Gingerbread house project beyond the toast rack. There are two versions of the toast rack ends: basic gingerbread house and gingerbread house with its owner/occupier on the doorstep.
Here are your freebies:
GingerbreadHouseCardRackEnds.pdf
GingerbreadHouseCardRackBody
GingerbreadHouseCardRackEnds.svg
GingerbreadHouseCardRackBody.svg
For co-ordinating cards to go with the card rack, go here.
Friday, 4 July 2014
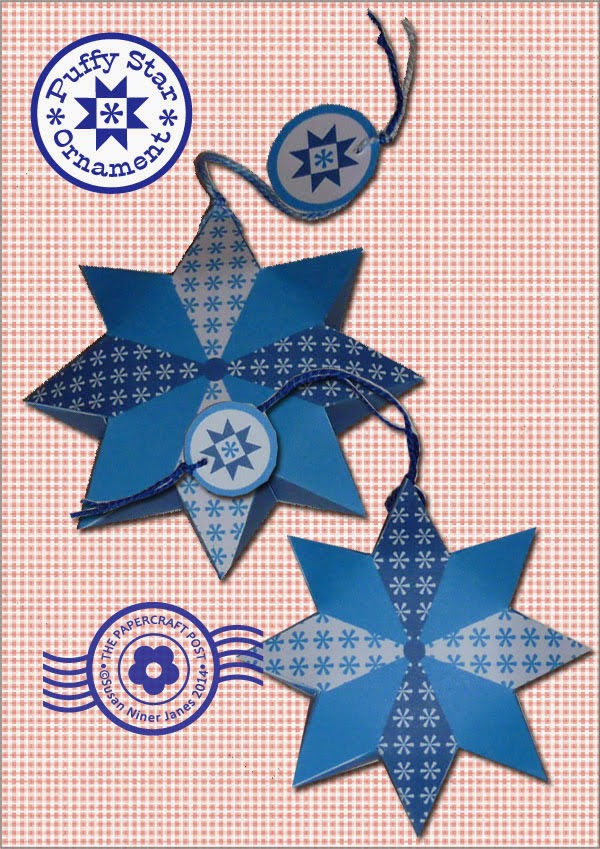
Puffy Star Ornaments
![]() |
| Three colourways. |
![]() |
| Two sizes. |
Here are your printables-
Hand-cut:
PuffyStarsBlue.pdf
PuffyStarsRed.pdf
PuffyStarsGreen.pdf
PatchworkStarCharms.pdf
Digi-cut:
PuffyStarsBlue.svg
PuffyStarsRed.svg
PuffyStarsGreen.svg
PatchworkStarCharms.svg
Patchwork Star Matchbox Ornaments, so they will co-ordinate perfectly.
Now I'll talk you through the making-up:
![]() |
| Crease folds as above. |
![]() |
| Start at the top. |
The stars join together in a zig-zag formation:
One side up, next side down, front to back, back to front - all around the star. Make sure that the little inter-star tabs are placed underneath the adjacent flap.
Pic above shows gluing an flap upwards. The adjacent flap has been temporarily folded back out of the way to allow clear access. (You can see one of the little triangular tabs just below the bent-back flap.)
Above, the flap that was bent back in the previous pic has been bent downwards and glued in place.
![]() |
| A look inside. |
I like to star gluing at the star apex, go partially the way around, then return to the apex and proceed in the opposite direction. I then complete the gluing at the bottom of the star. This ensures that the star
apex is all neat and tidy.
If you want to add the element of sound, pop a jingle bell inside before you've finished gluing.
Star's finished now. Just add the hanging loop and charm.
Remember that these Puffy Stars are designed to co-ordinate with the
Patchwork Star Matchbox Ornaments:
Sunday, 3 November 2013
Xmas Tree Card Rack
Here's another "toast rack-style" card holder. This one has a Ski Sweater Christmas tree motif on the end panels. The pointy apex makes it just a little bit trickier to make than the Reindeer Card Rack in my previous post (Reindeer Card Rack) - all will be explained in the accompanying tutorial. This is the last design in my Ski Sweater festive makes series.
Here are your free downloads:
XmasTreeCardRackSides.pdf
XmasTreeCardRackBody.pdf
XmasTreeCardRackSides.svg
XmasTreeCardRackBody.svg
Your files look like this:
Now for the how-tos:
Christmas Tree Card Rack Tutorial
1. Above, the pattern pieces cut out from cardstock. If you are making the .pdf version, you must carefully cut the slots using a craft knife held against a straightedge. Work over a cutting mat.
2. Place the slotted body piece on top of a printout of the pattern template. Carefully mark the fold lines with an embossing tool held against a straightedge. The fold lines are marked on the pattern template with lines to either side of the body piece.
3. Take extra care with the apex fold. Fold it over a metal straight edge. Make sure the creases are sharp.
4. Tamp down the fold with a bone folder to make sure the creases are crisp. Also score and fold the two end pieces (the trees).
5. All prepped and ready to go. Apply d/s tape to all the flaps.
6. Attach a tree end piece to either end of the base. Wings!
7. Attach the first two sides of the end pieces to th body piece. Tamp down the seal on the inside with a bone folder.
8. Fold up the base tab and stick the side tabs of the tree end pieces behind it. Then adhere the remaining two sides and the base, aligning edges. Pinch the apex, to make sure it makes a sharp point.
9. Above, the finished Xmas Tree Card Rack. You can reach inside to smooth down the flaps and make sure the joins are adhered properly.
Make up a batch of these in both the red and green colourways. Mix and match them with the Reindeer Card Racks. Happy card-browsing!
Next up: crafty book reviews. There are lots of lovely titles out this autumn!
Here are your free downloads:
XmasTreeCardRackSides.pdf
XmasTreeCardRackBody.pdf
XmasTreeCardRackSides.svg
XmasTreeCardRackBody.svg
Your files look like this:
Now for the how-tos:
Christmas Tree Card Rack Tutorial
1. Above, the pattern pieces cut out from cardstock. If you are making the .pdf version, you must carefully cut the slots using a craft knife held against a straightedge. Work over a cutting mat.
2. Place the slotted body piece on top of a printout of the pattern template. Carefully mark the fold lines with an embossing tool held against a straightedge. The fold lines are marked on the pattern template with lines to either side of the body piece.
3. Take extra care with the apex fold. Fold it over a metal straight edge. Make sure the creases are sharp.
4. Tamp down the fold with a bone folder to make sure the creases are crisp. Also score and fold the two end pieces (the trees).
5. All prepped and ready to go. Apply d/s tape to all the flaps.
6. Attach a tree end piece to either end of the base. Wings!
7. Attach the first two sides of the end pieces to th body piece. Tamp down the seal on the inside with a bone folder.
8. Fold up the base tab and stick the side tabs of the tree end pieces behind it. Then adhere the remaining two sides and the base, aligning edges. Pinch the apex, to make sure it makes a sharp point.
9. Above, the finished Xmas Tree Card Rack. You can reach inside to smooth down the flaps and make sure the joins are adhered properly.
Make up a batch of these in both the red and green colourways. Mix and match them with the Reindeer Card Racks. Happy card-browsing!
Next up: crafty book reviews. There are lots of lovely titles out this autumn!
Subscribe to:
Posts (Atom)


