Showing posts with label papercrafts. Show all posts

Friday, 17 July 2015

Fröbel Star Gift Box

Okay - you've done a quick study and you've mastered all the moves (as seen in yesterday's blogpost). Now you want to show off your new Fröbel Star-making skill to the world. You need a gift box - the perfect way to show off a single-sided Fröbel Star. It is the ideal adornment for a box lid - a fun alternative to a bow.

So - for you today, I have a freebie printable/print-and-cut box - sized exactly to fit a Fröbel Star on the lid. (The star must be constructed with 1.5cm/5/8in weaving strips.)

Here's the box:
FröbelStarGiftBox.pdf 
FröbelStarGiftBox.svg 
FröbelStarGiftBox.studio 

There's not much to know about making the box. Print, cut, score, fold. I've coloured-blocked the flaps to make them easy to fold. You need to attach the top flaps to either side of the top edge of the box, as indicated by the arrows. Quick method: d/s tape does the job.

Stick your Fröbel Star on top with a sticky dot.

I thought I'd give you an easy day today, since I ran you through the paces with all that Fröbel-folding yesterday. There's still more to come - playing with modular Fröbels!


Saturday, 23 August 2014

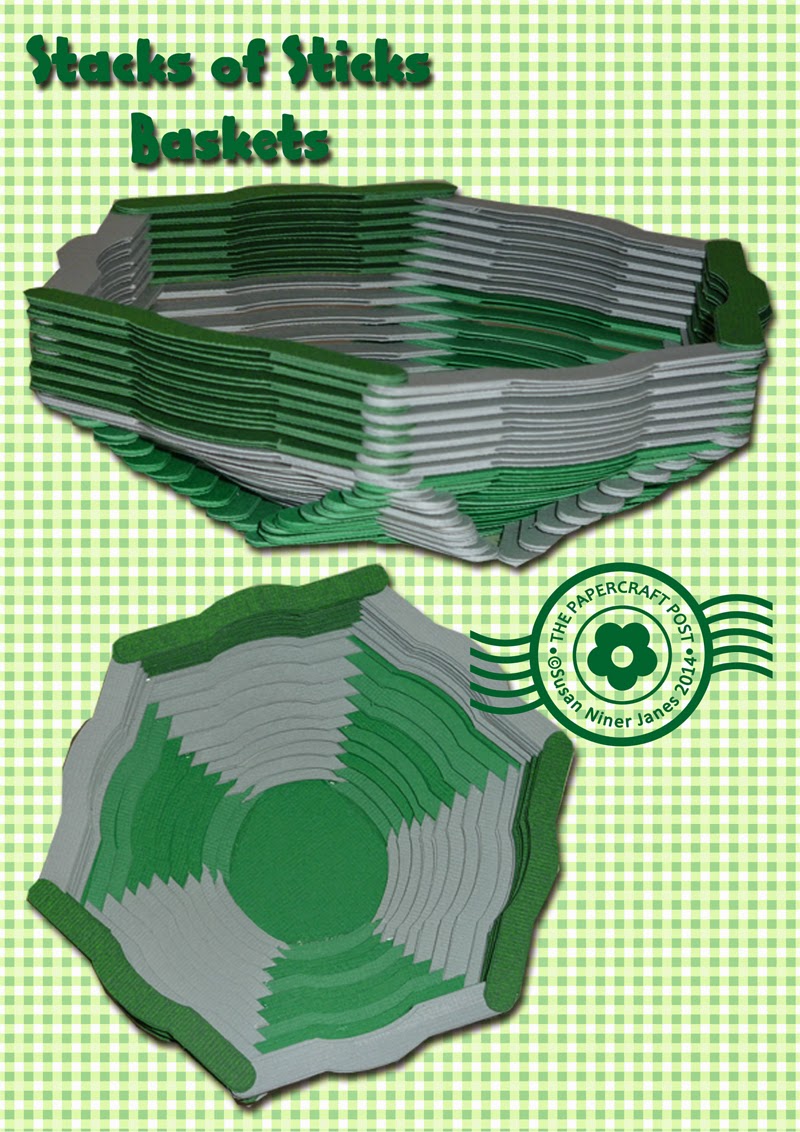
Stacks of Sticks Baskets

This being the tag-end of summer, I got to thinking about summer camp crafty projects, and inevitably, to popsicle-stick/lolly-stick baskets. I always enjoyed constructing them - it was fun to build up the baskets gradually, row by row, changing the shape by tweaking the placement of the sticks. So, I decided to re-invent Stacks of Sticks baskets for the digital age.

With my digital papercutter/plotter (my Silhouette machine), I can make building units in different styles and any colour. Wow. I've only just begun to play.

Here is your file, so you can have a go:
StackofSticks.pdf 
StackofSticks.svg 
I cut my sticks out of American Crafts Cardstock, in natural colours to give a rustic feel to the project. The card has a nice, pebbly texture, which adds to the campsite ambience. 

Of course, the card is not as thick as a lolly stick/popsicle stick, so you've got to construct a building unit yourself. For each unit, you need two similar stick shapes and four end spacers. Use tacky PVA glue applied with a cocktail stick. Each unit is a sandwich, edges aligned. Two spacers at each end, glued in between the sticks. Make up as many sticks as you think you may need, in the colours of your choice.

Base: I've given you a hexagonal basket base. Cut three, then layer and glue them together with edges aligned.

To construct the basket:
The basket is worked in rounds. The convex-shaped side of each stick faces outwards. 
First round: glue three sticks onto the base, spaced on alternate sides. The outer edges of the sticks are aligned with the edge of the base.
Second round: do the same for the remaining three base spaces, one level up.
For each subsequent round, glue the sticks on in alternate spaces, moving them outwards a smidge (the stick overhangs the edge of the previous round).
When you have moved outwards as far as possible, start building upwards until the desired basket height is reached. 

Note: the base pattern for the square basket is a 5cm (2in) square.

These baskets make excellent desk organizers. Or, pop a napkin inside and fill with party munchies.

Have fun making your Stack of Sticks baskets. I'm hoping to experiment with new stick shapes soon. (It would be nice to mimic a French Wire look...)


Thursday, 14 August 2014

Memo-in-a-Minute

Here's a simple back-to-school printable that's handy all year round. Choose from three styles of memo pad: joined at the top, joined at the side, or interlocking tabs. Print out as many memo pages as you want, make up the pad, then accessorize with a cigar band presentation wrap and paper paperclips!

The paper paperclips in a gift presentation/storage matchbox makes a fun project on its own. Cut the clips out of heavier-weight paper than the matchbox. I used American Crafts cardstock for the clips.

Here are your printables:
Memo-in-a-MinuteTop.pdf
Memo-in-a-MinuteSide.pdf
Memo-in-a-MinuteTabs.pdf
PaperClipsMatchbox.pdf

Memo-in-a-MinuteTop.svg
Memo-in-a-MinuteSide.svg
Memo-in-a-MinuteTabs.svg 
PaperClipMatchbox.svg 


Everything's a cinch to make, so no proper how-tos, just some tips and breezy notes!

* I like to print the Memo pages on yellow paper for a "legal pad" look.

* The Tab-top version pages interlock, like when you interlace your fingers to ponder something. For tabby memos of more than two pages, stack like-tabbed pages together before interlocking.

* PaperClips: cut matchbox out of 90gsm paper, cut clips out of cardstock. The clips look great in metallic card!

* Memos: make the page holes with a hand-held circle paper punch (I used 1/16" size). You can join the pages with craft thread bows or mini-brads. Cut 25cm (10in) of craft thread for each bow.

That's about it. Have fun making your memos and clips. You don't have to go paperless in a digital world! 


Saturday, 2 August 2014

Washi Beads & Gift Container

I'm still on my paper bead binge. Today's beads make use of washi tape - the papercrafter's favourite. All you have to do is cut out a paper bead strip from coloured paper and stick a piece of washi tape on the tip of the bead (the final 5cm/2in). Trim off the excess tape and get rolling. 

It's lovely how the colour of the bead strip shows through the translucent washi tape. And the subtly lustrous look of the matte sealer (Mod Podge Paper Matte) perfectly complements the translucency of the washi tape. Classy!

When the bead is rolled, gluing the washi tape is just a little bit tricky because the waxy finish of the tape resists gluing. To overcome this little glitch, I apply tacky PVA glue to the entire underside of the taped bead tip (instead of the usual little dab), then hold the tip in place for a moment or two until the glue sets. If you are impatient, you can secure the bead with masking tape until the glue sets (instead of holding the bead and waiting...). 

I've made you a fun gift box to go with the washi beads. Clock how the box resembles stacked rolls of washi tape! :) The contents of the box are up to you. Fill it with a completed necklace or with a kit consisting of beads plus a length of waxed cotton bead cord. (You need 12-15 beads to make a necklace.)

Here are your files:
BasicBeadShapes.pdf
WashiTapeBeadBox.pdf

BasicBeadShapes.svg
WashiTapeBeadBox.svg

For a refresher course in paper bead making, check out my Paper Bead Masterclass. 


Thursday, 3 April 2014

Paper Blooms by Jeffery Rudell: Review


25 Extraordinary Flowers to Make

For Weddings, Celebrations & More

By Jeffery Rudell

Lark Crafts, February 2014

Paperback, £ 12.99

ISBN 978 1 4547 0350 1


Star rating: *****


Paper flowers are mega-trending in the craft book world at the moment (not that they ever go away). So, when it comes to a paper flower-making title, you can pick and choose.  Paper Blooms, by papercrafter extraordinaire Jeffery Rudell, is my  personal favourite so far. It is not a huge book, but it is bursting with good ideas, warmth, and personality. 


The anecdotes to introduce each flower are charming, memorable, and relevant. Knock-out results are obtained with few materials and basic equipment. The flower construction techniques are simple to master – but ingenious.  And judicious paper choice makes a important contribution to the final creation – clock the anemones made out of glassine paper, and the sunflower centres constructed from rolled bands of corrugated cardstock.


Speaking of rolled bands of paper, many of the featured construction techniques will appeal to quilling enthusiasts. Examples: the Daisies have tightly quilled coils as flower centres, and the Cosmos have loosely –quilled coil centres. The Aster is a super-sized fringed quilling strip. 


The Ranunculus is simply an open coil, executed in double-sided paper, and placed on a stem. The result is breathtaking.  The author, expressing his “less is more” design philosophy says, “ ... this project relies on the simplest suggestion of a flower, little more than an abstraction of  a flower. Still, three facts become evident: 1) something can be beautiful without being complicated, 2) even simple skills yield attractive results, and 3) the tilt of a blossom, the bend of a wire, and the addition of a few leaves can greatly enhance any project.”


The 25 featured flowers are not literal, naturalistic fascimiles of real flowers. The idea is to capture the essential qualities of the flower in a creative way – visual essence of flower.  Many of the flowers combine methods of paper manipulation – such as the lovely Daisies, which consist of two staggered layers of folded paper and the (previously mentioned) quilled flower centre.


Other high points include the multi-layered (but manageable to make) Dahlias and the Carnations resourcefully crafted from coffee filters. Playful – and fun to make.


Instruction-wise, you are provided with photographic step-by-steps as needed.  Full-size flower templates are given back-of-book.

The Inspiration section does seem like a bit of an abbreviated afterthought.  Although the usage ideas are beautiful – and beautifully photographed – for the most part they are nothing you could not have figured out yourself.  This is a small gripe in an otherwise fabulous book.


The flowers in this book combine really clever construction techniques with simplicity of construction – that’s a winning combination. Vibrant colours and unusual paper textures contribute to the total effect.  This well-written and beautiful book is an ideal gift book for a crafty friend.

Note: I was given a review copy of this title.


Monday, 17 February 2014

Pop-Up Designs by Paul Jackson: Book Review

Cut and Fold Techniques for Pop-Up Designs

By Paul Jackson

Laurence King Publishing, March 2014

128 pages

Paperback, £15.95

ISBN 978 1 7806 7327 1


Star rating: *****


Papercraft expert extrordinaire Paul Jackson is back with a new addition to his excellent series of papercraft design titles for Laurence King Publishing. The subject of this title is pop-ups – I know, smile – but the content of the book is not what you are probably expecting. No, it is not slide-rule time for paper engineering geeks, but rather a streamlined system for designing one-page pop-ups

Written with the design professional in mind, the idea is to create a simple, attention-grabbing 3-D pop-up suitable as a backdrop for printed advertising – from just one sheet of card. Clock that, papercrafters: no gluing, nothing fancy. Stunning results from just one sheet of cardstock. According to the author, the technique “creates ‘negative’ (or empty) spaces behind sections of card which have been cut and folded to stand forward, so for every negative void there is an equivalent ‘positive’ of card.” The results are dramatic – sculptural, even architectural. Card-makers: this is the mother lode!

Like all of Paul Jackson’s titles in the series, you are taught the principles of the concept so you can master it and design for yourself. You learn how to create combinations of folds and cuts to make 3-D pop-ups that fold down flat. The first chapter shows how a simple slit in a piece of card can produce a variety of results, depending on how the paper is folded. In Chapter 3, Developing the Basics, you learn how to “Take the Cut for a Walk” – make a more complex cut line to create striking results. When varying the card silhouette is added to this, your options are multiplied bigtime (curvy or zigzag cut + different card outline shape = infinite possibilities). Chapter 4 is Releasing the Folded Edge. Here, you learn to create projecting sections along a crease to dramatic effect. Designs that really stand out! Chapter 5 is Multiple Gutters and Generations – fancy facetted creations – one-page pop-up graduate school, you might say.  Wow factor and something to aspire to. 
This book accomplishes its aim of teaching a specific papercraft design skill. It achieves this aim clearly, concisely, in style, and with humour and enthusiasm. 
Don’t forget to check out Paul Jackson’s other titles for Laurence King. You can build up a mini-library of papercraft titles to add to your papercraft expertise. Although written with the design professional in mind, these titles are user-friendly and completely accessible to the hobbyist papercrafter.

These titles are:

Structural Packaging: Design Your Own Boxes and 3-D Forms

This title, my personal favourite, is indispensible. It teaches you how to design a net – the 2-D pattern template for making a 3-D box.

Folding Techniques for Designers

This book is ideal for origami enthusiasts. It teaches how to create fancy multi-facetted folds ( these are currently in vogue for lampshades).

Cut and Fold Techniques for Promotional Materials

Fun stuff! Interactive novelty designs, such as flexagons - neverending movable folded shapes. The chapter on envelopes is superb.


In my next post, I’ll be featuring some one-page pop-ups that I’ve crafted after doing a quick study of Paul Jackson’s new book.

Note: I was given a review copy of this title.


Friday, 7 February 2014

Valentine Gift Printables

Here are some Valentine printables that you can make up in no time. The theme: Love Heart sweeties, so my guess is that you'll fill them up with sweet treats. Choose from gift bags or ice cream cups.

Here are your free downloads:
LoveHeartsGiftBagA.pdf 
LoveHeartsGiftBagB.pdf 

IceCreamCupScallopsA.pdf 
IceCreamCupStraightA.pdf 

IceCreamCupStraightB.pdf 
IceCreamCupBLidsBase.pdf 
IceCreamCupScallopsB.pdf 

As you can see, you have your choice of two gift bag shapes. The ice cream cups come in two prints, in either straight- or scalloped top. 

Everything is easy to make - so no tut today. For the bags, crease the folds, stick the side seam, and insert the base tab - you're done (apart from the gift tag and optional bow). You can make the bags foldable or more boxlike depending on the weight of the cardstock you choose.

Ice cream cups: flex the body piece to make it curve gently. Stick the back seam. Fold the base tabs. Apply glue to the tabs and lower the base into the cup. Make sure you do this on a firm surface. Make sure the base is flush with the surface. Next, adhere the tabs. Add the gift tag - tie it on through one of the slots. Fill the ice cream cup with the contents - the lid tabs fit in the slots.

Have a sweet Valentine's Day!